Monday, March 28, 2011

French Vintage Birthday Party


A few months back I decided to throw myself a birthday party. Why, do you ask, would I throw one for myself? It wasn't even a momentous year. 31. But after viewing so many cool parties online I realized I wanted to throw one. So I decided I could celebrate completing my 30th year happily. And if I threw it for myself I could be selfish and decorate and serve food just the way I liked it :)

I wanted to have a French theme because my husband and our one son at the time lived in Paris for a year back in 2005. Then I thought it would fit my personality better if it had a vintage twist! So French vintage it became in pink and aqua. I am so happy with how it turned out! Not to mention the fabulously fun time I had with friends and family.

Leading up to the door.


The goody bag station greeted them upon entering.


I wanted them to be able to cut off a piece of ribbon to tie up their glassine bag of goodies.


The Menu. I wanted just a dessert bar with some of my favorite French desserts. Including a dark chocolate tart, fresh strawberry tart, eclair's, madeleine's, 2 chocolate cakes including the beautiful ruffle cake, strawberry wafers, and lemon strawberry cupcakes.


Plus the lemonade stand. Paper straws are so fun to use!


The seating area was lined with doily garlands and tissue pom-poms. It cost $2. I purchased 2 packs of doily's from the $1 store, taped them in half to a string and hung! The pom-poms were the same ones used here.


By the end of the night I was pretty tired so you can see my makeup is wearing off a bit. But it was wonderful night. Of course my favorite part was visiting and laughing with family and friends from many stages of my life!


A few little things. I think this party came under a budget of $75, not including baked goods. I try using as many things that I already own, borrow a few things from friends and family, and then purchase what I have to, but knowing I'll use it again and again.

I used my daughter's changing table turned dresser because the colors matched perfectly. Or perhaps I painted it to match the party. I can't really remember. But now her room will have pink and blue!

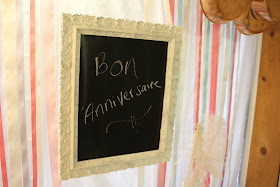
The chalkboard frame is a vintage frame spray painted white with a piece of chalkboard contact paper used to replace the glass.

For the table linens I used my mother's vintage aqua table cloth. The white pink detailed tablecloth is my grandmother's sheet. The ribbon wall was created by just taping each ribbon to a tension rod and resting it on two nails in front of a white tablecloth.

There were so many blogs that I follow that allowed for inspiration to create this party. Too many to share that I have bookmarked but so much great talent out there. Thanks for sharing!

And of course I could not have done this without the help from my family and friends. With setting up, making buttercream, photos, etc. And to my dear husband for taking our 3 children to Carl's JR for 2 hours to eat and play. I could not have done it without these people's help!

Sources:
Food, homemade by me with the exception of the Madeleine's made by my aunt and the store-bought eclairs.
Food tags made with my neighbors Cricut and vintage lace.
Food label harp clips, Food Service Warehouse.
Eiffel Tower and Feather, Michaels.
Paper Straws, Hey Yo Yo.
Glassine wax treat bags, In the Clear.
Flowers, Costco and Best Buds.
Apothecary jars, DownEast Home.
My jewelry, Kohls.
Metal scoops, Bosch kitchen center.
Cake peony (and in my hair), tutorial.
Tissue pom-poms, Martha Stewart from Michaels.

Sunday, March 20, 2011

Quick and Easy Homemade Rolls


Sounds like a pretty impressive title? Do you believe me? Well, check out the recipe, make them for yourself and you'll see that not only are these some of the easiest and quickest from-scratch rolls, they're delicious too! This recipe is from a family friend from Colorado. They are made, start to finish, in 50 minutes. No kidding.


Ready? 

Quick Rolls or 50 minute rolls
Yield: 24

Ingredients:
1 cup milk
1 cup water
1/3 cup sugar
1 tsp salt
2 Tbsp yeast
5 cups flour

Directions:
1. Turn on water to heat up to yeast rising temperature (about 115 degrees). Measure yeast (if not using quick rise yeast) into small bowl. Fill bowl with 1 cup water. Let sit and dissolve while you complete the next two steps.
2. Microwave milk in a small pyrex or other microwavable bowl until just bubbling, about 2 minutes.
3. In a large bowl mix dry ingredients together with a wooden spoon.
4. Add warm milk and warm water and yeast to other ingredients. Mix with wooden spoon until combined.
5. Knead into a ball, using the wooden spoon. If you need to, work it into a ball with your hands, but usually I just stir it in right in the bowl until it forms a ball (you don't need a floured surface for this one!).
6. Cover and quick raise in a warm place for 15 minutes. **
7. Remove bowl. Punch dough. Knead again.
8. Rise another 5 minutes.
9. Form balls and just schlop them onto a greased cookie sheet. They don't need to look pretty. If you'd like, you may add some sesame seeds to the top for extra flavor. See the photo for a few varieties. The "schloped" type, rolled ball type and clover leaf.
10. Rise in warm place for 15 minutes.
11. Bake at 400 degrees for 10-15 minutes!
12. Rub with butter as soon as they come out of the oven.

Did you do the math? Let me do it for you:
15 + 5 + 15 + 15 =50 minutes!

**TIP, I normally heat up my oven to the 170 degrees (or lowest your oven will go) and then turn it off and open the door for a few minutes to let some air out. I place the bowl inside the warm (but not too hot!) oven to rise if you are using a plastic bowl, make sure the oven is not too hot that it will melt your bowl! OR if your oven is in use put it in a warm microwave. Turn the micro on for about 1 minute (after it's already been heated up by warming the milk) and rise it in the microwave. Just don't forget it's in there and turn it on!

Enjoy!

Friday, March 18, 2011

Rainbow Cupcakes

Rainbow Cupcakes

Pretty fun, eh? I found this recipe form Our Best Bites. I really like their blog and use of practical tips for their recipes. They're a great resource for my menu. This particular recipe is a great base for any white cupcake. It's dense and moist, just like I like them to be!


And you take a bit, and voila! Color! Fun! Magic! It feels like you're eating a rainbow even though you're really not! One of these times when I makes these I'll try to flavor each color. But that would taste interesting....


The cool swirl frosting technique!


I highly recommend that you use Wilton's gel dyes instead of food coloring because you'll get a much more vibrant color and effect. These were a great addition to our St Patrick's Day (week) desserts. I think they'd also be a great addition to a carnival birthday party!

I have to admit that I made mine way too top heavy I filled mine with tablespoons of color instead of teaspoons like they suggest below so I ran out of space for the last two colors so you can barely see the blue and green peeking at the top. So really when I ate one it was really like eating two. And sometimes, twice in one day. Oops! :)
Rainbow Cupcakes
From Our Best Bites

1 white cake mix
2 eggs
1 C yogurt or sour cream
1/2 C milk
1/3 C vegetable oil
Combine all ingredients until incorporated (about 30 seconds). Scrape sides of bowl and then beat on med-high speed for 2 minutes.
Divide batter according to how many colors you are using. I used 5 colors and it worked out to a little over 1 cup for each color, but each cake brand will be slightly different.
Use food coloring to color batter to desired intensity.
To get a layered stripe like I used, you’ll want to put a spoonful of each color in the cupcake one at a time. The batter is thick, so it won’t spread on it’s own. A great tip is to set out a little bowl of water where you’re working. Dip your finger in the water and then gently spread the batter out. The water will make it so the batter doesn’t stick to your fingers.
Another tip is to use a measuring spoon and some water to measure out how many teaspoons/tablespoons are going to fit in your cupcake. Then divide that by how many colors you have so you know how much of each color to use for each cupcake. For my 5 colors, it worked out perfectly with 2 t of each color in each cupcake. So I put in 2 t of blue in the bottom of each cupcake and spread it out with my finger. Then I put in 2 t of green on top of that, then yellow, etc.
Bake them according to the package directions, until a toothpick comes out dry. "

The Frosting recipe I used is Wilton's buttercream, my new favorite frosting recipe because it doesn't taste too buttery and it's nicely thick and creamy. I used Our Best Bites frosting suggestion found here. You essentially paint a stripe, with the food gel of every color inside your piping bag before filling with frosting. Then frost as normal but it comes out in a cool rainbow swirl! Here is a photo of their technique.

What occasion would you make these cupcakes for?

Thursday, March 17, 2011

Green Eggs and Ham and Lucky Charms


This is only the second year I've attempted to make green eggs and ham for St. Patrick's Day morning breakfast. And today I played short order cook for my family, but it was fun! I know my 6 year old son only likes eggs in the boiled form, so he got to eat a bowl of Lucky Charms. Sadly, the book did not have enough clout to influence his palate. But his lucky charms were extra special today because they were in green milk with green sugar sprinkles.


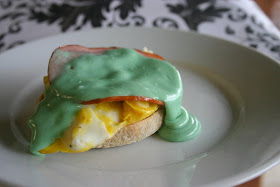
My husband thought this recipe was horribly salty. And I had to agree. It had a nice creamy texture and it didn't feel like we were eating raw eggs (because if you don't add the butter at the right temp, it can be). But next time, if I try this very quick and easy version again, I'll omit most of the salt.

I added a little extra butter to my husband's eggs, because, well, he can afford the extra calories unless like some of us in the house :)


What you see: Whole Wheat English Muffin (because I like to try to be healthy), fried egg, 1 slice Canadian bacon, Eggs Benedict dyed green.


Happy St Patrick's Day!

Tomorrow I'll post the last of this holiday series with rainbow cupcakes!

Wednesday, March 16, 2011

Rainbow Leprechaun Pancakes


Alternative to green eggs and ham for St Patty's breakfast? How about leprechaun sized pancakes? Make them rainbow colored for extra enjoyment!

Here is a quarter to give you perspective with how big, or small these little guys are.

Sadly, the purple ones got eaten before I could save them for the photo shoot :)

I didn't think about serving these little pancakes on the play dishes until it was too late. But that would have been fun too, though I really would have had to make them silver dollar sized. Serve with syrup and sprinkle some green sugar crystals on top for the final touch!

Idea source here


Grandma's Thin Pancakes:

My Grandma calls this recipe "Crepes" but they're not exactly crepes. They are similar to crepes but these are thicker. So we make them the size of pancakes (so smaller than crepes) but they turn out like really think pancakes (but thicker than crepes).

Add all ingredients, except flour, to a blender. Mix. Then gradually add flour.
2 cups milk
1 cup (or up to) water
4 eggs
2 Tbs oil
1 Tbs sugar
1 tsp salt
2 tsp vanilla
2 cups flour

Pour in frying pan or griddle to desired size. Cook four a couple minutes until slightly browned. Flip. Cook until reverse side is slightly brown. Serve with syrup, powdered sugar, fruit, whatever! Eat like pancakes (not rolled up like crepes). 

Tuesday, March 15, 2011

Rainbow pots


For family night on Monday night, we taught the children about the biblical symbol of a rainbow. Then they got to paint their own rainbow pots!

Remember these pots from this post? I found this fun idea from Ohdeedoh who featured Marie from Makes and Takes on Craftzine.

If they went to bed nicely, which they did....well enough, they'd get to search for the pot in the morning. I told them a leprechaun was going to bring golden treats if they were good and he hid them. So after breakfast I got my Irish accent on and led them on a treasure hunt around the house until they found their pot!

I filled the pots with the almond/toffee Hershey's nuggets, but let's be honest, those are for me. They just looked more like gold bars. The kids get the regular miniature candies (pictured in pot #2). In the next few weeks we'll plant some herbs and they'll get to watch them grow!


Supplies:
Newspaper, scratch paper
Paper-towels
Cup of water
Paintbrush or Foam brush
Terra-cotta pots: Joann's, under $1.50 for each set
Paint: Acrylic paints from my supply
Candy: Rite-Aid, $2

Friday, March 11, 2011

St Patrick's Day Ideas


St Patrick's Day is in less than one week? Do you have your green outfit picked out yet? I am finding it's difficult to find an outfit for my 4 year old pink and purple daughter. Do you have the same troubles? Of course, I did always want to wear green because being pinched in elementary school was always embarrassing.

I've seen some very fun ideas in the blogosphere lately. I was never into celebrating St Pat's much beyond green eggs and ham and some green cookies. Sometimes foods dyed green just look so unappetizing. But I've seen some alternative ideas. Why not rainbow themed foods? Go with the leprechaun theme and finding the pot of gold at the end of the rainbow.

Here are some ideas that I hope to implement next week starting tomorrow. I hope we'll feel up to going to this parade! What about you? What do you do?

I LOVE the look of these pancakes. I want to surprise my children with these when they wake up except that I'll make them leprechaun sized. But did you know what? After her pancakes were featured on some of the major blogs, she got a lot of hits. Great for her blog, right? But she also got a lot of flack for using food coloring in food for her children! Where have I been? I wasn't aware of the harm in that. But then she also got a lot of mean comments which she talks about on this post about the non-biblical view of the rainbow. Well, I fully support her photos and LOVE the idea of feeding my children these lovely rainbow pancakes!

Next up! Green Eggs and Ham!
Try Martha Stewart's easy Hollandaise sauce dyed green. Looks so easy! I am biased to eggs benedcit since I first tried them on my honeymoon at this 5-star resort hotel's room service! Soooo good! Last year I had seen ham with a green colored glaze. Does anyone have a recipe for that?

These are a fun variation of regular Rice Krispie Treats and presented so prettily. Recipe and pics found here.

Another dessert idea. I love the idea of these cupcakes. I might use these for this carnival birthday party too, except with chocolate frosting (though white looks better I just really like chocolate) and rainbow sprinkles.


This is a fun craft for the kids. Then you can always use the pots to help the kids start an herb garden!

Oh, and here's a fun clover leaf garland from Crafting Chicks you can hang for the day!

Pesto Pasta--St Patrick's Day Recipe 3


The first time I tried basil pesto sauce I got sick and consequently threw it up. It took a long time before I was willing to try it again. But once I discovered how delicious it is on Panini's I have since been reconverted to it, even more so after trying this recipe.

I found this recipe on Food Network by the Barefoot Contessa and tweaked it a bit by substituting some of the mayo for sour cream, adjusting the type of pasta and adding chicken.

Pesto Pasta
Yield: 12 servings

Ingredients:
1 1/2 pounds bow tie, fusilli, or any other combination of past
1/4 cup good olive oil
1 1/2 cups pesto (packaged or see recipe here)
1 cup frozen chopped spinach, thawed and squeezed dry
3 Tbsp freshly squeezed lemon juice
3/4 cups good mayonnaise
3/4 cup sour cream
1/2 cup freshly grated Parmesan
1 1/2 cups frozen peas, defrosted
1/3 cup pine nuts, optional
3/4 teaspoon kosher salt
3/4 teaspoon freshly ground black pepper
1 cup cooked shredded chicken, optional

Directions:

Cook the pasta, separately, if you are combining types of pasta, in a large pot of boiling salted water for 10 to 12 minutes until each pasta is al dente. Drain and toss into a bowl with the olive oil. Cool to room temperature.

In the bowl of a food processor fitted with a steel blade, puree the pesto, spinach, and lemon juice. Add the mayonnaise and sour cream. Puree. Add the pesto mixture to the cooled pasta and then add the Parmesan, chicken, peas, pine nuts (if using), salt, and pepper. Mix well, season to taste, and serve at room temperature.

Enjoy!

Thursday, March 10, 2011

White Chicken Chili--St Patrick's Day Recipe 2


Okay, okay. So this recipe is neither green nor Irish. But it has lovely green garnishes and it's fresh in my memory so I thought I would share this recipe with you for St Patrick meal inspiration. And, by the way, I am on a nacho kick lately. Just the basic, melted cheese on delicious tortilla chips (my current favorite are the Organic Kirkland brand from Costco). It's a nice touch to dip them in the stew.

White Chicken Chili--slow cooker style


Ingredients:
3 cans Great Northern beans, drained
2 lbs chicken, pre-cooked, shredded or cubed
1 medium onion, chopped
2-4 1/2 oz cans chopped green chilis
4 cloves garlic, minced
2 tsp cumin
1/2 tsp salt
1 tsp oregano, dried
1 tsp coriander, dried
2-14 1/2 oz can chicken broth
1 cup water
**If you'd like a more soup consistency, add more water.

Garnish:
Sour cream
Cheese
Lime
Cilantro
Nachos or tortilla chips

Directions:
1. Boil or brown chicken. Cube or shred.
2. Add all ingredients into crock-pot and mix.
3. Cook on Low for 10-12 hours or High for 4-6 hours.
4. Garnish with cilantro, sour cream, cheese and lime. Eat with nachos.