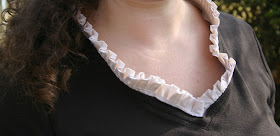
It's not really a pilgrim's collar. It's a tight ruffle. But I liked the tea-dyed nature combined with brown and the fact that I made it around Thanksgiving time that it reminded me of a pilgirm. And it's so simplisitc. A simple way to dress up a plain shirt. But in reality it's more like a Renaissance collar. And I certainly like my Shakespeare. So it's the renaissance collar shirt.
And I kind of feel like I'm wearing my daughter's Snow White collared dress with the way it stands up in the back.
Here is a back shot with my brown boots. I bought those 5 years ago when the said daughter with the dress was born! It's so fresh because her birthday is two days after Christmas, poor child.
Here's to the usual lose weight New Year's resolution!
Alright, now for the tutorial. Renaissance Collar V-Neck tutorial
What you'll need:
--V-neck T-shirt
--Tea, to dye your ruffle, optional
--Cotton Ruffle trim. Measure the length of your neck opening and buy 1" more. (around 1/2 a yard). I found this in the ribbon and trim aisle at any craft store, buy by the yard.
--Thread and sewing machine
First, you buy or find a V-neck T-shirt. Pre-wash it.
Second, buy ruffle trim. I found mine at Hobby Lobby for about $2/half yard. It only came in white and maybe pink. I didn't want plain white so I tea-dyed it. If you want to learn how to tea-dye I used these tutorials here and here. I used this Tiger thai chi tea (celestial seasonings) that we did not like to drink but it made for a nice rich reddish brownish collar and still smells great when I wear it!
Next, fold the ruffle in half. Center the ruffle with the back of the shirt and pin to the inside or wrong side of the shirt. Pin into place all the way down until the ruffles meet in the front.
Then, turn shirt inside out, and sew. Starting at one end of the ruffle working around. I first sewed right along the existing seam of the shirt and it laid nice and flat (like in the tutorial) but it left a little "flap" on the top that I was worried I'd have to iron closed after each wash so I decided to sew over it again (see photo above) but it made it ruffle or wave out a bit. So if you prefer it to rest more flat, then sew on the lower line. If you like the way mine flares out a bit, then sew on the above line. (like in photo below).
I am not an amazing seamstress with clothing. I mainly like to re-purpose clothing. So if you have any questions or comments, please let me know. You don't really have to be a seamstress to make this!


No comments:
Post a Comment