


Photobucket Photobucket Photobucket Photobucket Photobucket Photobucket

Thursday, January 17, 2013

Subway style pallet sign

I've seen a lot of of pallet projects around the web. In fact, I thought about starting a pin board just for them. I know the wood is junky quality wood but it lends itself to awesome rustic looking projects....and they're generally free if you can find a free pallet.


My husband and I have moved about 10 times in the 10 years we've been married. That's an average of once a year! As much as I hate moving,  I like the diversity in the places we've lived and grown our family together. As a 10 year anniversary gift I wanted to make Tyler a way to demonstrate this. I've seen several projects on Pinterest that I wanted to try. But then the thought came to me to use the pallet. I originally intended to use the pallet for a shelf (which I did, and I'll show you later) but I didn't want to waste the remaining wood. So I created this rustic looking subway art pallet sign. And I'm pretty happy about how it turned out. And better yet? The husband really digs it too. If you don't want to use family addresses you could use family rules, quotes or whatever to create the subway tile look. I was inspired by House of Smiths and this too.

It is a fairly simple but tedious project. I have to admit it took me more than one day to complete this project. So here goes the tutorial.


1. Find your pallet. This particular one was found by the side of a lake by my father. I drove it home attached to the top of my minvan. You can ask sales clerks outside of stores if you can take one of theirs. I know they recycle them sometimes but other times they just throw them out for scraps. The more character it has the better looking....but also more sanding.

2. Take it apart. First cut off the ends (as shown by Ana White). Save for those for another project (I have one I'll show you later). Then take each board off the main frame. This will take some muscle and a hammer or crow bar. Sometimes the nails are so weathered and rusted they're hard to get out of the boards. Do not throw any leftover wood away yet. You'll need most of it.

3. Once you have the amount of boards you'd like, cut them down to roughly the same size using a jigsaw.

4. Now, using two of the smaller, but sturdy, boards, flip it over so it lays flat. Arrange the other boards going across these two boards in the order you'd like so they fit snuggly.


5. Now, nail them onto those two back boards (as seen in photo). Glue with gorilla glue or wood glue, if necessary. Some of my boards were warped and did not lay flush so I filled in the gaps with instant drying gorilla glue (which puffs up a lot...but I am impatient and it doesn't show on the back anyhow).


6. Now sand away until it's smooth enough to paint on and is safe to handle.


7. Next, add hooks. The first hooks I added were very wimpy and fell out when I hung it. Keep in mind, these pallets are not lightweight and need very sturdy and strong hooks to hang it up.

8. Now for the fun part. Design your subway art. I used my silhouette cameo to design and cut out the vinyl. If you do not have one of these cutting machines check out Pinterest for other ideas that use stencils, paper rubbing and other alternative methods.


9. Be sure to measure each board (length and height) so you know how much room you have to add the text. Then play with different fonts and move around the text until you see what fits and looks right. I created a workspace that was the size of the pallet on the screen, just so I could see how it all fit. But my cutting mat is only 12"x 24" so I cut in different phases. I used Bookman old style (in bold) and Bodoni MT Black for the fonts. These addresses are not in chronological order. I wanted to make sure they all fit and looked good.


10. To save money I used contact paper. Unfortunately, mine was clear so it was really hard to see the lettering from the backing. If you use this, I recommend buying a dark contact paper. I set the blade to 1. Technically with vinyl you don't need to use the mat (I learned that the hard way....my mat is so cut up now) and had it double cut.

Once you have it all "printed" and cut each address out. So you have a bunch of strips of addresses or quotes or whatever it is on each board.


11. Once your letters are all cut weed out the centers of each letter. But be careful. Keep the little fillings of each letter in like the middle of the "e" and "A's" and "R's" etc. Don't lose those or you'll have to cut them again or make it up or just not use them.


12. Now add transfer paper to the top. Or, to save money, I used painters tape. It worked really nicely. My lettering was just under the width of the thick painters tape. It's just sticky enough to hold it together but not so sticky that it won't peel off.

Using the plastic scraper (or pampered chef dish scraper, or credit card or whatever works) press down the tape over the contact lettering firm and in the same direction.


13. Once it is stuck nicely carefully peel off the solid color of the contact paper. Throw that away.


You can barely see the letters transferred onto the tape. This is why colored contact paper would have been easier.


14. Now transfer the lettering to the board. Be sure it's centered. I made the mistake of being a little off centered on a few of mine and now it bugs me a bit. Using your scraper, gently scrape over the tape to adhere it to the wood nicely. Some of these boards have holes or really rough spots so make sure it's stuck all the way with no air pockets or gaps that paint can escape through. Then gently pull off the tape and the contact lettering will remain on the wood. Now you're ready to paint!


15. Pick your paint colors. I painted two layers so if you don't like the first color, re-mix and paint over it. Then it'll leave an even more rustic look. Use a foam brush or a regular paint brush and acrylic paints.


16. Paint over the lettering. Stay within the lines. Try to paint on top of, with blobs, dabbing. If you swipe it has a greater chance of getting underneath the vinyl and blurring your lettering.


17. Allow to dry before adding the next coat.

18. Once you're done painting allow to dry completely for several hours. Then gently peel off contact paper. Peel off in the opposite direction, slowly pulling back and not up so it doesn't accidentally pick up some of the paint with it. Then weed out the little filler letters (as seen in the "0).


19. And you're done! It's certainly not perfect, but neither am I so it works. Notice how there is only room for 2-3 more addresses!! Hint, hint to the husband. We've moved enough times!

Please, pin away. And do not hesitate to ask if you have any technical questions.


Print Friendly and PDF

Tuesday, December 11, 2012

Winter Wonderland Wands


In January my daughter celebrated her 5th birthday in real fashion. She wanted a peacock tea party and I wanted Alice in Wonderland. So we had a Winter Wonderland Alice in Wonderland Peacock inspired tea party. I was waiting for someone to request how I made the wands before I shared the tutorial. I apologize it is so late coming but perhaps you'll be able to use it for your own daughter's fairy wand or winter wonderland party. They take less than 10 minutes to make one and probably about $1 for materials. To be honest, these are not the most sturdy of wands. The snowflakes are fragile and the straws bend over time. But for the purposes of a pretty party favor or just dancing around magically like my daughters' like to do, they are simple to make, fun and inexpensive. 

 I have two variations. Ready?

VARIATION #1
PAPER STRAW WAND

1. Materials: You'll need hot glue (not pictured),  ribbon (about 20" long, 2 pieces), a paper straw, a wooden skewer, a Q-tip and a snowflake on a stick (I found this at Joann's for about . If you cannot find this I have also used $1 Tree snowflakes that are not on a stick, just glued it to the wand). 


2. First, cut your skewer to just shorter than the straw. Then cut the Q-tip in half. Slip the skewer in the straw and then shove one of the Q-tip pieces along side it, this is the bottom of the wand. Slide up the straw so you can't see them. 


3. Then, place the other Q-tip alongside those two pieces so it's nice and snug. 


4. Next, flip the wand over. You'll put a dab of hot glue on the top of the straw and gently slide the snowflake inside. It should slide right along side the skewer. Glue in place.


Slide flake down until the tip of the snowflake fits snugly inside the straw.


4. Then, add the ribbon. I can't remember the name of this knot. Maybe it doesn't even have one? 


5. Then put a dab of glue underneath the ribbon to hold in place. And you're done!


VARIATION #2
Dowel Wand

1. Materials: Hot glue, snowflake on a stick, wooden dowel (about 12" long. I found mine at Joann's in a pack of 10 or so) and long piece of ribbon (about 1 yard) plus extra of same or contrasting color for the end.


2. Put a dab of hot glue on the dowel and glue snowflake in place. 


2. Next, start adding the ribbon. Put glue over the snowflake stick and dowel about an inch at a time, on three sides of the dowel. Careful, don't burn your fingers as you gently press the ribbon in place over the glue. Gently pull the ribbon taut as you twirl the ribbon around the wand over the hot glue. Or you could twirl the wand as you hold the ribbon in place. Either way works. Whichever you're most coordinated with. Be sure to overlap the ribbon over itself a bit so the wood doesn't show.


3. Glue ribbon all the way down the dowel. When you get to the bottom, cut any excess ribbon and glue in place by overlapping a few times. Then tie the ribbon (as many as you'd like) around the bottom of the snowflake in a knot. Glue in place. 


 **If you cannot find these snowflake sticks use any snowflake. Glue to a painted dowel and glue ribbon on over just the top of the wand. 

If you have any questions, please email me. And feel free to pin away! 


Print Friendly and PDF

Monday, December 10, 2012

Mrs. Field's Chocolate Chip Cookies

i.e. one of the best chocolate chip cookies recipes out there!


Again, my mother-in-law gave us this recipe. She has so many great ones! This make a HUGE batch, so if you'd like, you can halve it (I've done so for you). Why are these the best? Well, first of all, they are simple to make. Second, the flavor is perfect with the combination of white and brown sugar. And lastly, because they are a touch crispy on the edges and perfectly gooey in the middle. I like to make a full batch of these and freeze half for school lunches and then use about 1/3 of the batch to use for my Butterscotch Cookie Dough Fudge Bars.  Please note about making a full batch......do so if you have a stand-up mixer because the hand beaters cannot handle the amount of dough the large batch creates.


Mrs. Field's Chocolate Chip Cookies
Yield: 90 cookies (FULL batch) / 45 cookies (HALF batch)

Ingredients:

  • 1 lb butter (4 sticks)/1 C butter
    • softened, almost melted (if I did not leave my butter out beforehand I melt it in the micro for about 30 seconds)
  • 3 C brown sugar/ 1 1/2 C brown sugar
  • 1 1/2 C white sugar/ 3/4 C white sugar
  • 3 eggs/ 1 1/2 eggs  --at room temperature
    • (I usually just try to break it over a bowl and take out half, or when I break it pour out half the yolk and half the white)
  • 2 Tbsp vanilla/1 Tbsp vanilla
  • 6 C flour/ 3 C flour
  • 1 1/2 tsp salt/ 3/4 tsp salt
  • 1 tsp baking soda/ 1/2 tsp baking soda
  • 4 C chocolate chips/ 2 C chocolate chips

Directions: 
  1. Pre-heat oven to 360 degrees.
  2. In a large bowl (see note in description above) combine the butter and both sugars. Cream well  until light and fluffy. 
  3. Add eggs, one at a time, mixing in between each addition.
  4. Add vanilla. Mix.
  5. Add dry ingredients. It will be very thick and hard to mix. 
  6. Add in chocolate chips, mix with a spoon.
  7. Bake, on ungreased baking sheet, for 8-11 minutes. DO NOT OVER BAKE. The tops should be lightly brown in areas. 
  8. Once cooked, remove from oven and allow cookies to settle for 5 minutes on cookie sheet. 
  9. Carefully remove from pan and allow to cool on cooling rack.
  10. Enjoy warm with a glass of milk!
  11. Keep stored in airtight container. 


Print Friendly and PDF

Friday, October 19, 2012

Pumpkin Crumble Cake

Another recipe! I swear, this isn't a food blog. I just love to eat and share recipes that family members and friends always request. This is certainly one of those. When my friend Julie made this two years ago at a Halloween party I was incredibly impressed by this recipe. And Each time I make it, someone requests the recipe.

I've seen several versions of this around. They all vary slightly by how many layers (this has three), milk vs. evaporated milk vs. sweetened condensed milk, the combination of spices and the amount of pumpkin puree. I stick to this one because it seems cheaper/easier since it calls for regular milk yet it's still rich and filling.


Pumpkin Crumble Cake
Yield: 24 servings

Ingredients--by layers: 
Layer 1:
1 box white or yellow cake mix, 1 cup separated
1/2 cup butter, melted
1 egg
Layer 2: 
2 cups canned pumpkin puree (not the kind with spices added), or 2/3 of 29 oz can
3 eggs
1/2 cup brown sugar
1 1/2 tsp cinnamon
1/4 cup sugar
1 pinch nutmeg
Layer 3: 
1 cup reserved cake mix
1/2 cup flour
1/2 cup nuts, pecans or walnuts, chopped
1/2 tsp baking powder
3/4 cup sugar
1/2 cup butter, cold


  1. 1. Pre-heat oven to 350 degrees. Grease a 9x13 glass dish. 
  2.  Mix Layer 1 ingredients, (be sure to reserve 1 cup cake mix) and press down covering bottom of 9x13 pan. 
  3. Combine ingredients in Layer 2 in a large bowl. Mix with a spoon or wisk. Pour over Layer 1.
  4. Combine ingredients in Layer 3 except butter. Cut the butter into mixture with pastry blender (or criss-cross two forks). Sprinkle this crumble mixture over top of Layer 2.
  5. Bake for 35-50 minutes or until browned and no longer giggly in middle (do not over or  under bake). 
  6. It can be served warm or left to cool for at least 2 hours. I prefer to eat it at room temperature or chilled. Serve with whipped cream.


Print Friendly and PDF

Saturday, October 13, 2012

Loaded Cheesy Potato Soup


Tired of your regular potato soup recipe? Kick it up a notch by adding cheese, an abundance of vegetables  and flavor with touches of chicken, bacon and garlic.


Loaded Cheesy Potato Soup
Yield: 6 servings

Ingredients:
6 Tbs butter with a dab of olive oil
1/2 C carrots, sliced
1/2 C celery, sliced
1/2 large bell pepper, red, orange or yellow
1 C onion, chopped (about 1/2 large onion)
1 clove garlic, minced
2 large cooked potatoes, chopped into 1" cubes
1/2 C flour
2 1/4 C milk
2 C chicken broth, or one can
1/2 tsp thyme, dried
1/2 tsp basil, dried
1/2 tsp salt
1/2 tsp pepper
8 oz cheddar, shredded
4-8 slices bacon, chopped or crumbled

1. Steam chopped potatoes until barely soft when pricked with a fork.
2. Melt butter and oil in large saucepan.
3. Add celery, carrot, onion and potatoes. Saute for 10 minutes or until vegetables are tender.
4. Add garlic and saute until fragrant, about 30 seconds.
5. Stir in flour to form a roux.
6. Gradually stir in milk and broth. Bring to a boil.
7. Add thyme and basil, salt and pepper to taste.
8. Reduce heat, simmer for 15-20 minutes.
9. Once thickened, add cheese and stir until melted.
10. Garnish with bacon.

Enjoy! Print Friendly and PDF

Wednesday, October 10, 2012

Onesie Baby Shower

I was able to co-host a baby shower for my sister-in-law. It was nice to be able to share the load for this party! It was so much to plan!! I think it came together nicely and most importantly, the mom-to-be was happy the whole night.

The main activity, other than eating, was to make onesies. And although I didn't get a photo of it, the other gals planned a fun game. They put baby food in a diaper and we had to smell (and in my case, taste) the diapers and guess which flavor they were. I've played it with candy bars smeared in the diaper. Both are fun ways to play the game.

The theme for this shower was in color and that was about it. She is having a boy so I tried to keep it masculine yet cute and festive for the mom too. The colors were aqua, orange, brown and grass green. I found a lot of inspiration on Pinterest and kept this at a budget.


Do you recognize the changing table from this party


 Diaper cake made by my sister-in-law. The diapers even matched the color theme!


Baby advice written on onesie shaped cardstock (I used my silhouette to cut all of them for this party). 


I found these letters at Michael's on clearance for 50 cents a piece! I spray painted them to match. Now she can take them home and display them in the nursery. Can you tell the "A" is a bit wonky? It started out as an "R". There weren't any "A's" left so I cut it down. My cutting skills are never exact. Or my pattern skills....I should have painted the "O" blue and the other "N" green. Oops. 


 These 8" lanterns were a great price! Only $.90 each plus shipping from this store.  Tons of colors and sizes. And fast shipping. So fun!


Costco's Jalapeno Artichoke dip and pita chips. Yum!


My mother-in-laws famous mint brownies. 


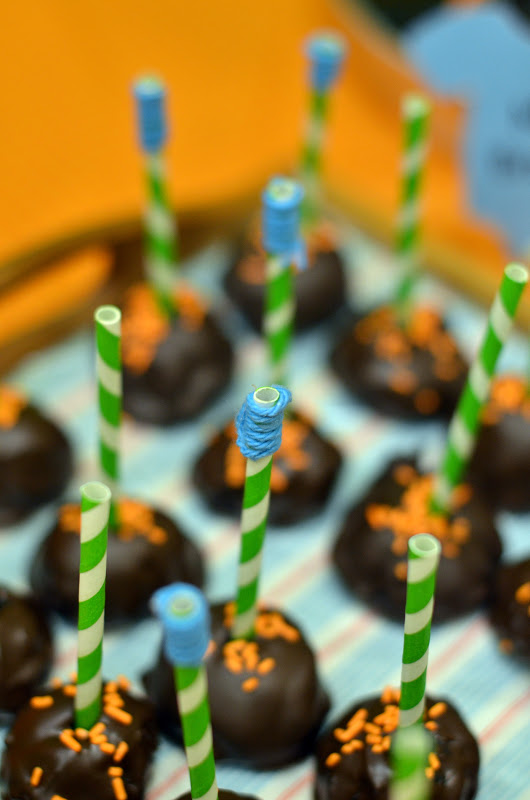
Oreo truffles.  Recipe here. Or, in my case, oreo blobs. I am NOT a cake decorator cake ball person. But I enjoy eating them! 


Ready to Pop snack. Recipe here. 


Bubble bath punch. Or in this case, Ocean punch. Another SIL created this yummy drink.  The toys are from Toys r' us. The recipe and idea for the punch are here. 


Cucumber and orange water. 


Heidi and her sisters, mom and grandmother!


Heidi & friend Melanie (She's a talented photographer, check out her site)


Making onesies. There are a ton of tutorials online (I used some of these on my Pin board). Basically, I gathered up my fabric scraps, used heat n' bond iron-on sewable adhesive. My other talented sister-in-law drew, free handed, 20 baby shapes including cars, caterpillars, airplanes and more.  We traced those out onto the heat n bond, ironed it to fabirc, cute that out and then ironed it onto the onesie! We made 4 of each age, from ages 3-6 months up to 24 months. The lucky mom walked away with a loot of baby clothes! And each one is personal and made by her friends!


 Party favor. My mother-in-law also made onesie shaped sugar cookies. Something very similar to these. I am so mad at myself for forgetting to take a photo. They took a long time to make but they were so adorable. They are inside these goodie bags. 


Price breakdown: $146.50 total, divided 
Ouch! That seems like a lot altogether. It includes all handmade food items and items like paper straws and lanterns that I will use again. Fortunately, other family members helped foot the bill. The onesie activity took up just over one third of the cost but it was my baby gift to her as well. I am ball-parking on some of these because I did not actually purchase them as it was a group effort.

Onesies (on sale from Babies 'r us): $40
Favor bags: (clothes pins & kraft bags from Target $1 aisle, paper free): $6
Cookies-- homemade, plus clear bags: $4
Paper lanterns (Paper Lantern Store): $15
Oreo Truffles:  $3.50
Carrots/Celery: $2
Jalepeno Dip/Chips (Costco):  $12
Diaper cake: $10
Punch w/toys: $10
Paper straws (Zurchers): $10
Cheese crackers: $2
Popcorn: $5
Paper goods: $12
Other craft items (yarn, basket, giant clothespins) (Michael's): $10
Diaper game (diapers & baby food): $5
Heidi! For letting me use her camera!


Print Friendly and PDF