Photobucket Photobucket Photobucket Photobucket Photobucket Photobucket
Showing posts with label birthday. Show all posts

Sunday, October 2, 2011

Lego Birthday Party: Photo goods

I am not a graphic designer or even very savvy with Photoshop. I use Picasa a lot to do basic editing before going to Photoshop. When I saw this Lego party invitation on delia creates, I thought it was genius! Lego self portrait, inexpensive, simple and classic.
Samuel took the photo for his invite. I added the text using Picasa and then printed them at Costco, 13 cents each. The "envelope" that is made out of lego cardstock (found at Joann's) was actually more expensive then the invite. But all under $3 to create a set of 8. If you don't want to create your own, Delia has a free printable version already made up for you!

Here is the printed "welcome" sign that greeted the boys that I mentioned earlier.


Also inspired by delia creates, I made each boy a place card held by it's own Lego stand. Samuel helped me create these as well. I added the cool bubble and text using Picnik. Then at the end of the party, I taped them to their favor box so they knew whose belonged to who.


Each boy had his own lego guy, picked out and created by Samuel. I just collaged two images into one, and printed on 4x6 and cut in half. It was a perfect size. I ended up spending under $4 for all of these photo goods.


That's all for the Lego Birthday Party! I had so much fun planning this party.  I'd appreciate it if you linked back to this if you used it for you inspiration. And let me know! I'd love to see how your parties turn out!

Check out all the details of this party:
Inspiration Board: Pinterest
Part 1
Part 2: Decorations
Part 3: Food
Part 4: Games
Part 5: Party Favors
Part 6: Photo Goods
Print Friendly and PDF

Lego Birthday Party: Party Favors

The party favors cost me under $3 each, maybe even less. That's my kind of favor!

Ikea Lego looking boxes: re-purposed. To be honest, they were used. My mom is a school teacher and she used them in her 1st grade classroom for crayon boxes. She didn't need them anymore so I took them, cleaned them up (using W-40 to remove the crayon marks and dish soap) and they're as good as new. FREE.


Coloring Book: Free. This party here gave me a lot of inspiration and info. And I used this website to create a maze and a crossword puzzle. Just copied and pasted, cut to size, covered with spare scrapbook paper, and sewed together. 

The pencil sharpener came from Zurchers (25 cents each), & the mini red pencils I purchased on eBay in bulk.

Lego kit. 30 cents each on Christmas clearance.

Lego Candy. Purchased at my local grocery store for $4.20/lb. I bought about 1 pound. They are so fun because they can actually be played with. Plus, it didn't hurt that they actually taste good (like sweet tarts).


Lego mini-fig crayons. I paid $9 for the mold (I found it on eBay in a set with a lego block mold). The crayons were gathered from our broken collection. Although these took a lot of time it was pleasurable recycling the broken crayons. But the kids had fun helping me make them and they are fun to color with! I won't repeat what others have already explained as far as instructions. If you'd like to make your own, there are some great instructions here.


Check out all the details of this party:
Inspiration Board: Pinterest
Part 2: Decorations
Part 3: Food
Part 4: Games
Part 5: Party Favors
Part 6: Photo Goods
Print Friendly and PDF

Wednesday, September 28, 2011

Lego Birthday Party: Games

There are many many fun and simple game ideas that you can find on the internet. From building lego towers, car races, to lego bingo and ring toss. I chose 4 simple activities that would take up enough time to fill the 1 1/2 hour party plus 15 minutes for cake/ice cream and presents at the end.

The first game they started with....once they noticed it was here....was to guess how many lego candies were in the small jelly jar with spray painted lid. I gave them a hint to make it easier, like it's  a number between 10 and 100. The boy who guessed the closest got to take the jar home. I made the sign on Picnik via Picasa. I took a photo of this Lego dude and added the text and graphics for free! Then I printed it at Costco for 13 cents.


Because each boy received a Lego city boat kit (remember....30 cents a piece, otherwise you could invest in one of those big boxes of Legos and give each boy a pile to build a car or boat with) we took the first 15 minutes, once everyone arrived, to build them. Once they were built, we had a boat race. Just fill a kiddy pool, arm them with a straw, set the rules (like no using hands) and let them race. The boats didn't float as well as I hoped but it didn't stop them from playing anyway. They inevitably got a little wet, but they dried off quickly!


Next up: Balloon scavenger hunt. I saw this balloon idea on Pinterest from Martha Stewart. The balloons were stapled to the shed (but you could pin them to a sheet, tablecloth or tape them to butcher paper and tack to a wall) in the shape of an "S" for Samuel. We filled each balloon with a number that lead to a destination around the house/yard. Whoever found the next clue got to pop the next balloon. My husband had the list of locations and they'd ask him which corresponded with that number and they'd run to the next destination. They were so out of breath! And it took a lot of time because they had to run back and forth. The final destination had a bowl with their party favors inside, so everyone won this game.


 Last game...which was very messy by the end of the party was 
suck a Lego onto a plate. We dumped a bunch of smaller Lego's onto the center of the table and I timed them for 2 minutes, whoever got the most Legos on their plate, using only a straw, won a box of bubblegum balls.


In between games there was a lot of running, chasing, drinking liquids, eating treats, etc.

Check out all the details of this party:
Inspiration Board: Pinterest
Part 1
Part 2: Decorations
Part 3: Food
Part 4: Games
Part 5: Party Favors
Part 6: Photo Goods
Print Friendly and PDF

Tuesday, September 27, 2011

Lego Birthday Party: Food

I chose to serve sweet treats instead of savory. I've noticed at kids parties all they want to do is play and have fun. They usually waste their snacks, including the cake. So instead of serving pizza and snack foods, to save money and not waste so much food (though there are so many cute ideas for Lego inspired food snacks) we served sweets and started the party at 2pm and ended at 3:30. After lunch but still soon enough so it wouldn't spoil their dinners. Needless to say, they were on quite the sugar high....or maybe it's just friends getting together to celebrate, the natural high.

The cake.  Samuel wanted a tall Lego shaped cake. He wanted it to be the color of sand, like a desert. One of his gifts was this Prince of Persia beetle and dude, which matched the theme perfectly. The knobs are made of marshmallows (candy coated because I ran out of frosting). The inside is made of this doctored up chocolate cake from a box (without the coffee or toffee). And as usual, I used Wilton's buttercream frosting. If I would have realized it would be this ugly brownish color, I would have made peanut butter frosting! Mmmmmm, chocolate and peanut butter.
I saw this cake stand idea on Pinterest so I mimicked it. But my cake stand was showing underneath so I added a little more bunting.


I made the little cookies 'n cream Lego blocks that line the cake by simply by melting white chocolate chips, adding crushed oreo's, and then pouring them (using a ziplock bag, cut at the tip) into the Lego mold with miniature chocolate chips placed in the "knobs" of the mold.


My kids and I made angry bird cupcakes, though out of theme, my son loved playing the game on my phone....until recently he no longer plays it. But they were so cute I wanted to give them a try. The idea came from The Crafting Chicks.  Plus I needed something to use for the little "knobs" of the Lego blocks shown here.


Samuel's only food request, other than the cake, was "green drink", ie Sprite. I saw these kid sized bottles and thought they were perfect. More than I would normally spend on drinks but they came in a pack of 8, perfect amount. Plus they had these little dimples that looked Lego-ish to me.


I simply covered the existing labels with Lego name labels. You can find the font for free here. I simply printed them off on white paper, colored the outside with yellow, cut around, and glued to a red piece of cut card stock. I adhered them with two scrapbook sticky squares, and then sealed it in back with a piece of scotch tape. Then I simply taped the blue and white paper straws (found for super cheap on Amazon).


I provided them with cups as well, for extra beverage and so I could make these fun koolaid ice cubes and they could see their Sprite change color as it melted. I found the silicone molds in a set of lego blocks and mini-figs (used to make crayons) on Ebay for $19 shipped. The biggest splurge for this party.

How can you have a party without marshmallow or cake pops? I always opt for marshmallow because they are cheaper and easier. After I dipped the large marshmallow's (see tutorial here) I added a mini marshmallow to the top. My son informed me that it looked more like a hat. So later I cut them down and just smeared some more on top. And added faces with an icing tube with a small writing tip, not the edible ink kind because I couldn't find one and this was more useful for other projects. They are stored in a painted egg carton stand.


Wait until the large marshmallows are dry to put the tops on. After I dipped the mini marshmallow, holding it with a toothpick, I used another toothpick to slide it on to the top like you see here.


Check out all the details of this party:
Inspiration Board: Pinterest
Part 1
Part 2: Decorations
Part 3: Food
Part 4: Games
Part 5: Party Favors
Part 6: Photo Goods
Print Friendly and PDF

Sunday, September 25, 2011

Lego Birthday Party: Part 1

My oldest child turned 7 last week! I have a seven year old son! I still can't believe it. For his birthday theme, I didn't really give him a choice. Mean, perhaps, but smart. In January a friend of mine reported (on Facebook, no less) that she scored some Lego men stocking stuffer kits for 30 cents a piece!!! I asked her if her store had any more (she lives in a different state) after I had already scoured mine. She had actually purchased 12 and realized she didn't need that many and sold 11 to me. It was decided then that his theme would be Lego. And I didn't care what type of Lego he wanted.....star wars, harry potter, pirate, etc. Whatever he liked. I've been planning it since March! Thanks heavens for Pinterest as I've found so much inspiration from it, you can view my Lego Party inspiration board. This party from delia creates, in particular was most helpful.

Seven boys were invited, one per year of age, and although I am sad that some my son's friends couldn't come, I am glad that it was a more intimate group of 4 friends. I was prepared, mentally, for a crazy bunch! But physically I wish I was a little more prepared.

For example, this table was used for eating, playing games and building. I should have set up a second table to eat on, so that the Lego's candies and sprite did not all mix together ;)


The Dessert Table
The boys


The birthday boy with his specifically designed cake.


His favorite gift.....one that I bought in January half price. I secretly encouraged him to keep liking the "Power Miner" Lego theme (I don't think it's even sold anymore) so he wouldn't lose interest in this gift. My ulterior motives at work, haha.


I had so much fun planning this party! All on a $50 budget. I like to be as frugal as possible without compromising on style whenever possible.
Keep checking back this week. I will share more posts with all the little details for this party!

Check out all the details of this party:
Inspiration Board: Pinterest
Part 2: Decorations
Part 3: Food
Part 4: Games
Part 5: Party Favors
Part 6: Photo Goods
Print Friendly and PDF

Saturday, January 22, 2011

C's Caterpillar Birthday Party


Happy Birthday banner in bright colors, found in my shop.

My baby turned 1 yesterday! Oh, sigh. She is a wonderful little bug. Hence the theme, the Very Hungry Caterpillar Birthday party. It served more as inspiration and did not reflect literally in all the decor.

I took the colors in the book and brightened them up a bit. I also used the holes in the food the caterpillar ate as inspiration. So polka dots and pom poms came to mind.

I tried to have the food from the book as well. I interpreted that very loosely too. You can see the lollipop and cupcakes on the table. The rest of the food we had for dinner in the form of yummy homemade panini's! The fruit was represented in the trix cereal! Haha. Hey, it's winter, good plums and strawberries are hard to find!

Thanks to my dad for being the resident photographer. One less thing for me to have to worry about!


Fabric leaf garland found in my shop. The tablecloth is a shower curtain found on clearance at Target. Last minute purchase that matched perfectly!


Such cute wrap around bloomers from Rae Gun! Oh, what a fun addition! Thanks Marissa! The leggings are actually ladies socks from Target. I used this tutorial.

I wanted to make a variation on this cake bunting. I debated the many options. Making felt triangle pennants. Making paper triangle pennants. Making fabric triangle pennant bunting (like I did for this party). Making scalloped fabric bunting. Making pinwheel bunting. And on and on. There are so many options! Until I realized I wanted to match the pom-poms and go along with the polka dot theme found in the "holey" food that the caterpillar ate through. Plus it resembles a caterpillar, just a bit, don't you think?
And so it is
fabric pom-pom cake bunting!

Twine purchased from the etsy shop Cupcake Social. The frosting is this recipe. I have tried so many and they were either too buttery, shiny, greasy, etc. This was perfect for decorating. And not too sweet tasting!

Caterpillar cupcake "cake" inspiration from here.


The fabric poms. These little babies took an hour each to make. I made six in total. Let's just say there was a lot of late night Netflix watching going on this week! I interpreted this tutorial here. I deliberatly chose colors that will be used in my girls room. I will hang them in there once they share in a few weeks.


The archway of pom poms and another fabric leaf garland.


The bowl of "fruit", ie Trix. I stole this whole concept, of the Ikea $1 frames on top of a filled jar, from my friend Tiff (She has a fabulously creative blog here). I'm just aching looking at this photo though because I didn't have time to put a ribbon with a little "c" tied to it around that vase. It's so tall and bare. Ah, well. There were more important things to make like the bib and the hat!


The bib. Made with scraps of some of my very favorite fabrics. How I miss you pink circle fabric.

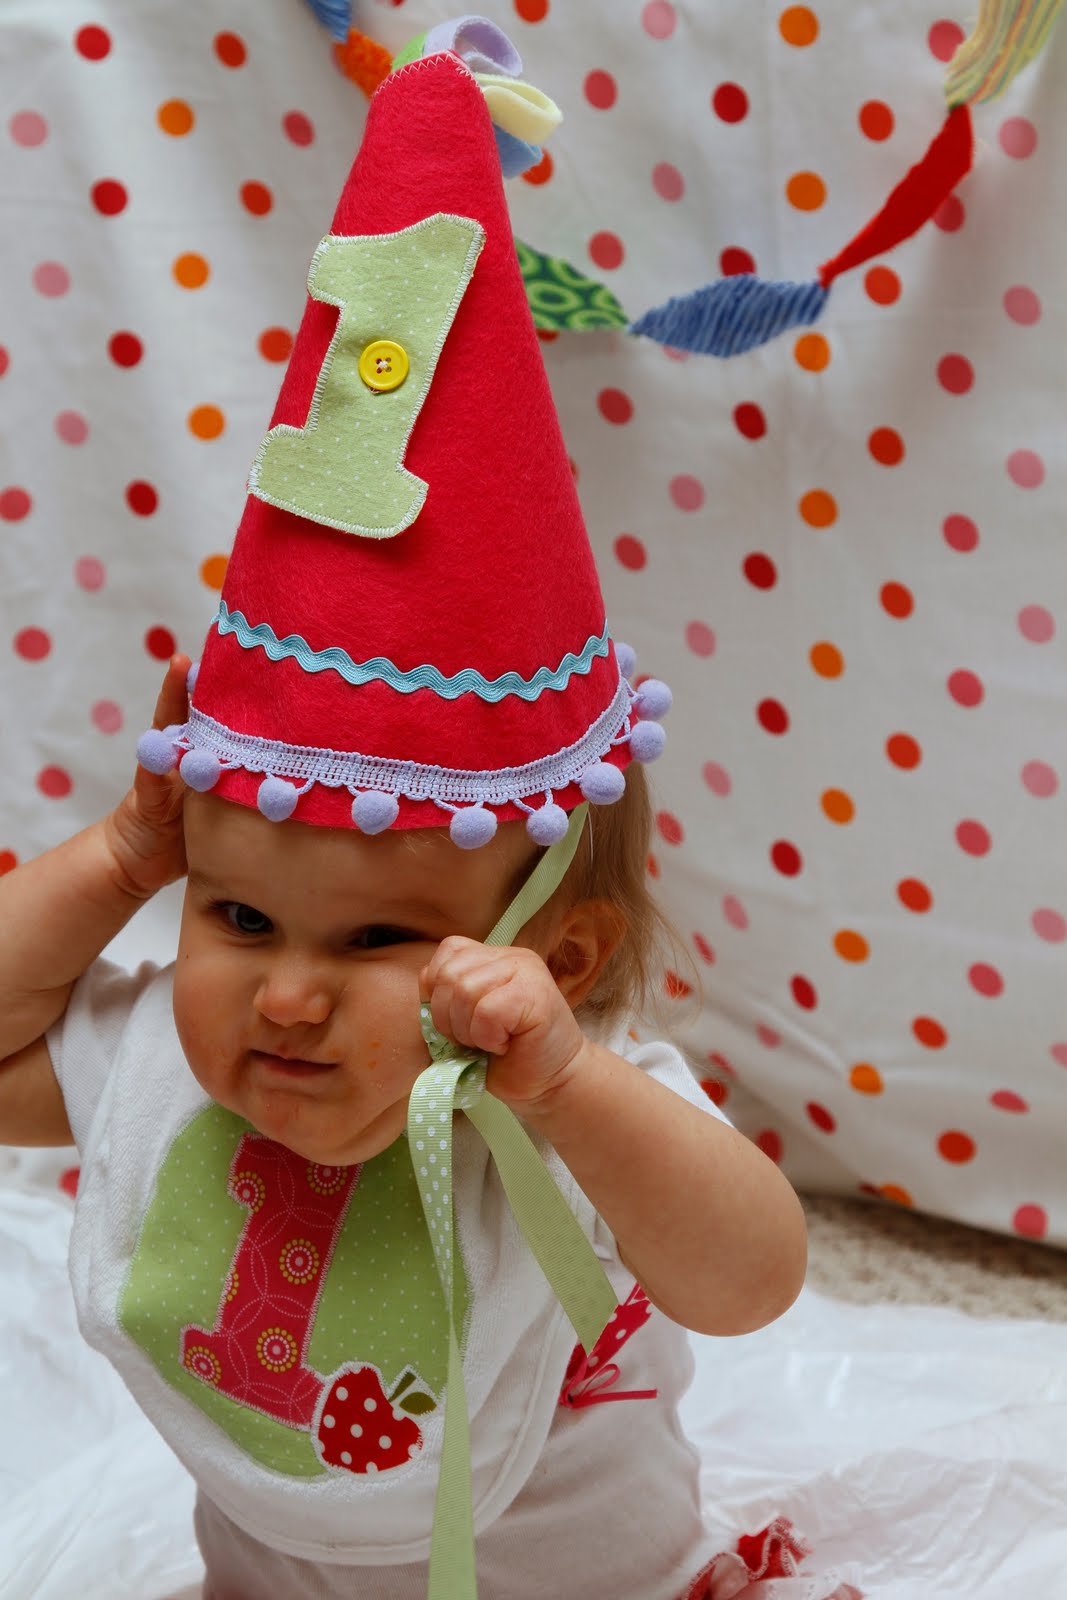
The hat. This is my second attempt at making a birthday hat. The first was way too small and this was a bit too tall. I'll keep trying. I am happy with the way it looked though and functioned just right.

Caterpillar onesie I made complete with a holey piece of fruit. I bought the strawberry fabric for another project and it worked perfectly for her shirt and bib! The fabric is from the etsy shop Frolic Design.

And now for some fun classic photos!

Luckily, she decided to keep it on!


I love you, little cuddle bug!

Print Friendly and PDF