Photobucket Photobucket Photobucket Photobucket Photobucket Photobucket
Showing posts with label tutorial. Show all posts

Tuesday, December 11, 2012

Winter Wonderland Wands


In January my daughter celebrated her 5th birthday in real fashion. She wanted a peacock tea party and I wanted Alice in Wonderland. So we had a Winter Wonderland Alice in Wonderland Peacock inspired tea party. I was waiting for someone to request how I made the wands before I shared the tutorial. I apologize it is so late coming but perhaps you'll be able to use it for your own daughter's fairy wand or winter wonderland party. They take less than 10 minutes to make one and probably about $1 for materials. To be honest, these are not the most sturdy of wands. The snowflakes are fragile and the straws bend over time. But for the purposes of a pretty party favor or just dancing around magically like my daughters' like to do, they are simple to make, fun and inexpensive. 

 I have two variations. Ready?

VARIATION #1
PAPER STRAW WAND

1. Materials: You'll need hot glue (not pictured),  ribbon (about 20" long, 2 pieces), a paper straw, a wooden skewer, a Q-tip and a snowflake on a stick (I found this at Joann's for about . If you cannot find this I have also used $1 Tree snowflakes that are not on a stick, just glued it to the wand). 


2. First, cut your skewer to just shorter than the straw. Then cut the Q-tip in half. Slip the skewer in the straw and then shove one of the Q-tip pieces along side it, this is the bottom of the wand. Slide up the straw so you can't see them. 


3. Then, place the other Q-tip alongside those two pieces so it's nice and snug. 


4. Next, flip the wand over. You'll put a dab of hot glue on the top of the straw and gently slide the snowflake inside. It should slide right along side the skewer. Glue in place.


Slide flake down until the tip of the snowflake fits snugly inside the straw.


4. Then, add the ribbon. I can't remember the name of this knot. Maybe it doesn't even have one? 


5. Then put a dab of glue underneath the ribbon to hold in place. And you're done!


VARIATION #2
Dowel Wand

1. Materials: Hot glue, snowflake on a stick, wooden dowel (about 12" long. I found mine at Joann's in a pack of 10 or so) and long piece of ribbon (about 1 yard) plus extra of same or contrasting color for the end.


2. Put a dab of hot glue on the dowel and glue snowflake in place. 


2. Next, start adding the ribbon. Put glue over the snowflake stick and dowel about an inch at a time, on three sides of the dowel. Careful, don't burn your fingers as you gently press the ribbon in place over the glue. Gently pull the ribbon taut as you twirl the ribbon around the wand over the hot glue. Or you could twirl the wand as you hold the ribbon in place. Either way works. Whichever you're most coordinated with. Be sure to overlap the ribbon over itself a bit so the wood doesn't show.


3. Glue ribbon all the way down the dowel. When you get to the bottom, cut any excess ribbon and glue in place by overlapping a few times. Then tie the ribbon (as many as you'd like) around the bottom of the snowflake in a knot. Glue in place. 


 **If you cannot find these snowflake sticks use any snowflake. Glue to a painted dowel and glue ribbon on over just the top of the wand. 

If you have any questions, please email me. And feel free to pin away! 


Print Friendly and PDF

Thursday, February 23, 2012

Potty Treat Tutorial


Marshmallow & Doughnut Potty Treats

Here is a quick tutorial on how to make these cute little potty's from the Potty Training Party.

1. Gather Materials. 
--Gigantic Marshmallows
--Cooking shears, sprayed with vegetable spray, like PAM
--Decorating gel, or you could try Nutella or peanut butter or frosting
--Small powdered sugar doughnuts


You're done!


If you look closely you can see the yellow decorating gel oozing out of the seat.....it looks kinda gross, so if you don't want that look, put less gel on those seats.

Featured on:


Print Friendly and PDF

Thursday, February 2, 2012

Renaissance Collared Shirt Tutorial

I saw this shirt on Say Yes to Hoboken over a year ago and have wanted to make it since. I finally got around to it and I'm please with how it turned out. I opted for the more inexpensive route of using ruffle trim instead of ribbon. And I sewed mine inside the shirt instead of directly on top.

 
It's not really a pilgrim's collar. It's a tight ruffle. But I liked the tea-dyed nature combined with brown and the fact that I made it around Thanksgiving time that it reminded me of a pilgirm. And it's so simplisitc. A simple way to dress up a plain shirt. But in reality it's more like a Renaissance collar. And I certainly like my Shakespeare. So it's the renaissance collar shirt.


 And I kind of feel like I'm wearing my daughter's Snow White collared dress with the way it stands up in the back.


Here is a back shot with my brown boots. I bought those 5 years ago when the said daughter with the dress was born! It's so fresh because her birthday is two days after Christmas, poor child.


Here's to the usual  lose weight New Year's resolution!
Alright, now for the tutorial.

Renaissance Collar V-Neck tutorial
What you'll need:
--V-neck T-shirt
--Tea, to dye your ruffle, optional
--Cotton Ruffle trim. Measure the length of your neck opening and buy 1" more. (around 1/2 a yard). I found this in the ribbon and trim aisle at any craft store, buy by the yard.
--Thread and sewing machine

First, you buy or find a V-neck T-shirt. Pre-wash it.


Second, buy ruffle trim. I found mine at Hobby Lobby for about $2/half yard. It only came in white and maybe pink. I didn't want plain white so I tea-dyed it. If you want to learn how to tea-dye I used these tutorials here and here. I used this Tiger thai chi tea (celestial seasonings) that we did not like to drink but it made for a nice rich reddish brownish collar and still smells great when I wear it!


Next, fold the ruffle in half. Center the ruffle with the back of the shirt and pin to the inside or wrong side of the shirt. Pin into place all the way down until the ruffles meet in the front.


Then, turn shirt inside out, and sew. Starting at one end of the ruffle working around. I first sewed right along the existing seam of the shirt and it laid nice and flat (like in the tutorial) but it left a little "flap" on the top that I was worried I'd have to iron closed after each wash so I decided to sew over it again (see photo above) but it made it ruffle or wave out a bit. So if you prefer it to rest more flat, then sew on the lower line. If you like the way mine flares out a bit, then sew on the above line. (like in photo below).


I am not an amazing seamstress with clothing. I mainly like to re-purpose clothing. So if you have any questions or comments, please let me know. You don't really have to be a seamstress to make this! Print Friendly and PDF

Saturday, October 22, 2011

Marshmallow Spider Pops

Halloween is almost here! Are you ready? Do you have all of your costume assembled? Your trick-or-treats bag retrieved out of storage? Or are they still sitting on top of the Halloween box where you left them a year ago? It's been a year since last Halloween already??

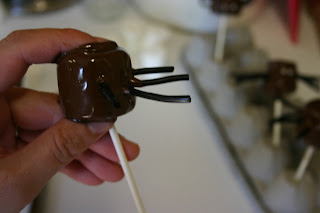
For my daughter's preschool group the beginning of October I decided to make an experimental treat. Marshmallow spider pops. I had seen a cake pop version and wanted to try this simplified version.


These are simple, but a bit messy.
Needed:
--6 large marshmallows
--1 cup chocolate chips
--6 feet black licorice rope (on3 small package is plenty)
--2 edible pearls for eyes
--6 popsicle or succor sticks


First, cut up black licorice ropes into 2-3" pieces. These will be your legs.You simply melt about 1 cup chocolate chips in a microwave safe bowl for 1 minute. Continue cooking, for 30 second intervals. stir. Repeat until melted.

After dipping marshmallows in chocolate, see this tutorial here, and while the pop is still wet, holding onto the pop with your left hand, gently take a sharp knife and create 4 small slits onto either side of pop. Gently push 1 spider leg into each slit. Smooth over any missed spots. Dry in a sturdy vase or egg carton to dry. To quicken the drying process, refrigerate for 5 minutes until firm.


You can make wolf spiders, by adding toasted coconut.


 Dead spiders, with the curly ends of licorice rope, facing up and eyes on the bottom. 


 Go ahead, take a bite!
Print Friendly and PDF

Saturday, May 14, 2011

Bake Sale


I have a few topics to cover today. All doing with school! This is the last week of school for my Kindergartner! I can't believe the school year is over already!

Yesterday the school had their biggest fundraiser of the year, the only one in fact. A huge extravaganza. It was fabulous! The kids and I had non-stop fun for 3 full hours. And that beats selling candy bars door-to-door!

I signed up to bring a food item for the bake sale. And I brought something that I didn't actually have to bake but I knew would be popular. Marshmallow pops! Here is a tutorial, FYI. I was trying to think of something that would hold them while they dried and that I didn't mind donating along with the goodies. I thought about using $1 store floral foam. But I wanted to save time, money and to recycle. So then I thought of an egg carton (not styrofoam...not sure that the paint would stick as well). The perfect marshmallow pop stand! It's sturdy, simple, inexpensive, raised like a little cake stand, and it's recycling.


It's simple! All you need to do is tape the lid, on both sides, with masking or packing tape so the sticks don't fall through the holes when you flip it over. If the sticks lean over too much, then scrunch a paper towel inside before closing to act as filler.


Then cut a hole or "x" on the bottom of the center of each cone where the egg rests. Lastly, you or your children can paint it. I've used acrylic paints and spray paint, and the acrylics coat better. It does absorb a lot of paint, but it still uses a minimal amount. Be sure to let it dry completely before placing the pops inside. I blow dried mine to hasten the drying process but I did not dry it inside so when I placed the sticks inside it was still a little wet and got some paint on some of the sticks. So let it dry and then it's all ready! Just place each pop in the hole. It fits 1 dozen perfectly!


Print Friendly and PDF

Tuesday, January 25, 2011

Freezer Paper stenciling

Have you tried it yet? It's awesome!! It's so easy! And so versatile!

All you need is:

Freezer Paper. Found on Amazon, Walmart or your local grocery store.


Fabric paint.


Clothing, pillow cover, etc...


And then supplies.

Scissors, exacto blade, printer, and an iron.

Then follow this tutorial from one of my favorite blogs. I Am Momma-Hear Me Roar!

The only suggestion I would add to her video is that instead of printing the picture off then using it as a stencil, just run it through your ink-jet (not laser) printer. Or use your silhouette, cricut cool type machines.

Plus, to hasten the drying process just use a hair dryer to get that paint to dry more quickly. And wait at least 24 hours for it to completely dry before washing or wearing.

Here are some more tips: http://www.quiltbug.com/articles/freezer-paper.htm

And then you end up with something like this! More of these projects to come! Seriously, it's so easy!

It's a baby gnome onesie for my cousin's baby! Now go and make stuff! Print Friendly and PDF

Friday, June 4, 2010

PDF Pattern NEW IN SHOP


It's here!!! It's finally here! In October my dad generously took step-by-step photos of me sewing the birthday banner that I sell in my shop. And now I've finally made it into a PDF file that can be purchased and emailed right to you! Free shipping! And now you can sew one yourself! Wahoo!

Do you like to sew? Feeling crafty? Would you like to customize your own birthday banner? You easily can with this PDF Pattern.

This pattern is designed to be easily used by all sewing levels including beginners. With over 25 clear and colorful photographs.

Tools and Materials needed are:
--Sewing machine
--Fabric
--Scissors
--Straight pins
--Measuring tape
--Thread
--Felt
--Bias tape
The exact amounts are listed in the pattern.

This pattern is an Adobe PDF file. You will need Adobe Acrobat Reader to view and print this pattern--available free at www.adobe.com.

This pattern is for personal use only. It is not to be shared, copied, emailed, or sold. It took many hours to develop this pattern and it is copyright protected. It cannot be used to sell any banners on Etsy or elsewhere. I will consider granting permission to use in large group settings such as a craft night or church group. Please email me first. Thank you!

Check it out here. And thank you to my dad, Dave & Georgia of this shop, and Carrie, Rachael and Ashley who were my "testers." Thank you!

Happy Sewing! Print Friendly and PDF