Photobucket Photobucket Photobucket Photobucket Photobucket Photobucket

Thursday, October 27, 2011

Featured


Kelle, from Ann Kelle, the designer of Metro Market fabric line through Robert Kaufman featured my little play kitchen as a fabric sighting on her blog. I was delighted to see a message personally from her in my inbox.  I've used her strawberry fabric for several projects like J's baking party and then again for C's Caterpillar birthday party. I love the strawberry fabric she designed and still have some left to use for more projects!  Thank you Kelle for the feature! Check out her other fabrics and designs for tiny prints cards! I have been seriously contemplating buying her helicopter fabric for a project for my nephew.


And on another note....Do you ever feel like this? Especially around holidays? Cecily, my almost 2 year old,  has been sick lately and grumpy, which is very out of character for her so I've been feeling this a bit too, while trying to create a Halloween atmosphere. On another note, I updated the photo for PW's awesome Chicken Pot Pie recipe. I modified it by adding biscuits (time saver). Yum! Nothing like a little comfort food.

Print Friendly and PDF

Monday, October 24, 2011

Halloween Crunch: Sweet Popcorn Treat

When it was still safe to eat homemade goodies given to us while trick-or-treating, as a child I loved receiving popcorn balls. I've been looking for a non-caramel popcorn treat for a while and then I saw this on on Pinterest from Our Best Bites.

I modified their recipe a bit to my tastes and you can mix and match however you like it too.


Halloween Crunch
adapted from Our Best Bites

Ingredients: 
12 cups popcorn (see easy tutorial here)
1 pound almond bark

Then add whichever nuts and candies you'd like. I added the following:
1 cup almonds, or any variety nut
1 cup m&m's (any kind, plain, peanut butter, peanut, etc)
1 cup candy corn

Pop popcorn (either microwave method or healthier quick method) and place in the largest bowl you have. Add m&m's, candy corn and nuts. Mix. Next, melt almond bark according to directions on package. With spatula, gently pour melted almond bark over popcorn mixture. Stir occasionally. Then take a long sheet of foil, wax or parchment paper and lay flat. Spread popcorn mixture on top. Allow to dry, about 1 hour.


Print Friendly and PDF

Saturday, October 22, 2011

Marshmallow Spider Pops

Halloween is almost here! Are you ready? Do you have all of your costume assembled? Your trick-or-treats bag retrieved out of storage? Or are they still sitting on top of the Halloween box where you left them a year ago? It's been a year since last Halloween already??

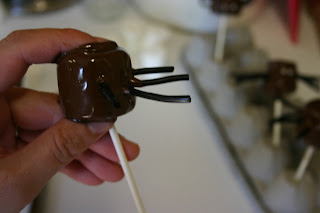
For my daughter's preschool group the beginning of October I decided to make an experimental treat. Marshmallow spider pops. I had seen a cake pop version and wanted to try this simplified version.


These are simple, but a bit messy.
Needed:
--6 large marshmallows
--1 cup chocolate chips
--6 feet black licorice rope (on3 small package is plenty)
--2 edible pearls for eyes
--6 popsicle or succor sticks


First, cut up black licorice ropes into 2-3" pieces. These will be your legs.You simply melt about 1 cup chocolate chips in a microwave safe bowl for 1 minute. Continue cooking, for 30 second intervals. stir. Repeat until melted.

After dipping marshmallows in chocolate, see this tutorial here, and while the pop is still wet, holding onto the pop with your left hand, gently take a sharp knife and create 4 small slits onto either side of pop. Gently push 1 spider leg into each slit. Smooth over any missed spots. Dry in a sturdy vase or egg carton to dry. To quicken the drying process, refrigerate for 5 minutes until firm.


You can make wolf spiders, by adding toasted coconut.


 Dead spiders, with the curly ends of licorice rope, facing up and eyes on the bottom. 


 Go ahead, take a bite!
Print Friendly and PDF

Wednesday, October 19, 2011

I was featured!

This is old news by now but I haven't had time to share other then on Facebook. The good news is that my play kitchen was featured on one of my favorite websites, ohdeedoh. Wow! Seriously, it's like a dream come true! I love this blog and it is such an honor to be featured on it.

If you are new to Bonne Nouvelle you can find the featured post here. The abridged repurposing of the play kitchen is here and the unabridged, detailed version can be found here! Thanks for looking!


Print Friendly and PDF

Tuesday, October 18, 2011

Brown paper bag popcorn

Tuesday's Tip: Microwave Popcorn in a brown paper bag


Friday night is movie night at our house, and if meals are eaten up, that means popcorn too! The kids look forward to it each week. We typically make our popcorn in a popcorn popper similar to this one using this completely unhealthy but very much like movie popcorn oil. But sometimes the kids want a quick snack, or I want a healthy salty snack to munch on instead of chips (I said sometimes...).

Try this trick next time you reach for the pre-packed microwave popcorn.  I learned this trick in college while experimenting. The first time I made it I put too many kernels in and they spilled out everywhere but it worked and I modified it. Microwave kernels directly in a lunch paper sack and add your desired amount of salt and butter. It takes 3 minutes and about 2 extra steps. Plus it's the healthiest method!

First, you need 1/3 cup of kernels.


Next, fold down the top of the bag twice. Place bag, upright, in the microwave (Yes, I retouched the splatters inside the microwave so that it looked cleaner. Can you believe it?). Heat for 2-3 minutes; using the "popcorn" button, or until the pops are about 2 seconds apart. You don't want to burn it!


Remove the hot bag. While holding it closed, shake it a bit. With your finger (or unless it burst open naturally like mine did), poke a finger sized hole at the bottom of the bag. You can now gently shake out the old maids and re-pop them later.


Season with salt and melted butter, if desired.
1/2 C kernels = about 12 cups popcorn
Print Friendly and PDF

Sunday, October 2, 2011

Lego Birthday Party: Photo goods

I am not a graphic designer or even very savvy with Photoshop. I use Picasa a lot to do basic editing before going to Photoshop. When I saw this Lego party invitation on delia creates, I thought it was genius! Lego self portrait, inexpensive, simple and classic.
Samuel took the photo for his invite. I added the text using Picasa and then printed them at Costco, 13 cents each. The "envelope" that is made out of lego cardstock (found at Joann's) was actually more expensive then the invite. But all under $3 to create a set of 8. If you don't want to create your own, Delia has a free printable version already made up for you!

Here is the printed "welcome" sign that greeted the boys that I mentioned earlier.


Also inspired by delia creates, I made each boy a place card held by it's own Lego stand. Samuel helped me create these as well. I added the cool bubble and text using Picnik. Then at the end of the party, I taped them to their favor box so they knew whose belonged to who.


Each boy had his own lego guy, picked out and created by Samuel. I just collaged two images into one, and printed on 4x6 and cut in half. It was a perfect size. I ended up spending under $4 for all of these photo goods.


That's all for the Lego Birthday Party! I had so much fun planning this party.  I'd appreciate it if you linked back to this if you used it for you inspiration. And let me know! I'd love to see how your parties turn out!

Check out all the details of this party:
Inspiration Board: Pinterest
Part 1
Part 2: Decorations
Part 3: Food
Part 4: Games
Part 5: Party Favors
Part 6: Photo Goods
Print Friendly and PDF

Lego Birthday Party: Party Favors

The party favors cost me under $3 each, maybe even less. That's my kind of favor!

Ikea Lego looking boxes: re-purposed. To be honest, they were used. My mom is a school teacher and she used them in her 1st grade classroom for crayon boxes. She didn't need them anymore so I took them, cleaned them up (using W-40 to remove the crayon marks and dish soap) and they're as good as new. FREE.


Coloring Book: Free. This party here gave me a lot of inspiration and info. And I used this website to create a maze and a crossword puzzle. Just copied and pasted, cut to size, covered with spare scrapbook paper, and sewed together. 

The pencil sharpener came from Zurchers (25 cents each), & the mini red pencils I purchased on eBay in bulk.

Lego kit. 30 cents each on Christmas clearance.

Lego Candy. Purchased at my local grocery store for $4.20/lb. I bought about 1 pound. They are so fun because they can actually be played with. Plus, it didn't hurt that they actually taste good (like sweet tarts).


Lego mini-fig crayons. I paid $9 for the mold (I found it on eBay in a set with a lego block mold). The crayons were gathered from our broken collection. Although these took a lot of time it was pleasurable recycling the broken crayons. But the kids had fun helping me make them and they are fun to color with! I won't repeat what others have already explained as far as instructions. If you'd like to make your own, there are some great instructions here.


Check out all the details of this party:
Inspiration Board: Pinterest
Part 2: Decorations
Part 3: Food
Part 4: Games
Part 5: Party Favors
Part 6: Photo Goods
Print Friendly and PDF