Photobucket Photobucket Photobucket Photobucket Photobucket Photobucket
Showing posts with label bonne nouvelle. Show all posts

Tuesday, February 26, 2013

Magazine Rack Doll Crib

Make your own wood baby crib for under $10!


I love to thrift shop. We live on a tight budget and so if I want to add anything to my home it's usually from a garage sale, thrift store or found used online. While the kids and I were shopping for baskets and bins and such we came across this magazine rack. My 6 year old daughter immediately said what I had already thought in my head but didn't want to say aloud (so I didn't spoil the 3 year olds birthday present),

 "It's a crib!" 


Proud mamma moment. She could see the potential this dusty object had.

So I bought it for $5.60, on sale and stored it at home until I had the right moment to clean and fix it up. 

With one can of spray paint, handmade bedding and a birthday later, she now has a sturdy doll crib. I have to remind her that she is too big too sit in it or it will break. And the girls have discovered that Otis, the rabbit, likes to comfortably lay in it too.

To make your own doll bed from a magazine rack takes about 1 hour of your time.


First clean off the magazine rack. Then cut out any middle dividers. 


As you can see this one had a divider on the bottom too. This took the longest to remove because the base of this rack is very thin wood (hence the reason Cecily can't sit in it). So I finally figured out that it was stapled (and not glued) and I was able to pry it off with a metal scraper. 


 Then spray paint the whole thing! And don't do it in windy weather (like it says on the can) or you'll get drips! Ugh. I hate drips. If you want, embellish with a sticker or silhouette (I used my cameo to cut the vinyl to create a silhouette). Cecily is our little butterfly (she has blossomed from the caterpillar she was 2 years ago here). I used nearly an entire can of spray paint. I think this was apple green by Rustoleum.


Then make some bedding. If you'd like me to post a tutorial for this bedding leave a comment and I'll add some more photos and details. It's basically a reversible pad with batting in the middle and embellished with piping (I thought it was safer to try do do piping for the first time on a doll bed instead of real bedding). It was fairly simple to do.


 The reverse side of bedding.


Total budget:
$5.60 for magazine rack
$3.50 spray paint, with coupon at Joann's
FREE fabric and batting from stash
$9.10


Print Friendly and PDF

Tuesday, December 11, 2012

Winter Wonderland Wands


In January my daughter celebrated her 5th birthday in real fashion. She wanted a peacock tea party and I wanted Alice in Wonderland. So we had a Winter Wonderland Alice in Wonderland Peacock inspired tea party. I was waiting for someone to request how I made the wands before I shared the tutorial. I apologize it is so late coming but perhaps you'll be able to use it for your own daughter's fairy wand or winter wonderland party. They take less than 10 minutes to make one and probably about $1 for materials. To be honest, these are not the most sturdy of wands. The snowflakes are fragile and the straws bend over time. But for the purposes of a pretty party favor or just dancing around magically like my daughters' like to do, they are simple to make, fun and inexpensive. 

 I have two variations. Ready?

VARIATION #1
PAPER STRAW WAND

1. Materials: You'll need hot glue (not pictured),  ribbon (about 20" long, 2 pieces), a paper straw, a wooden skewer, a Q-tip and a snowflake on a stick (I found this at Joann's for about . If you cannot find this I have also used $1 Tree snowflakes that are not on a stick, just glued it to the wand). 


2. First, cut your skewer to just shorter than the straw. Then cut the Q-tip in half. Slip the skewer in the straw and then shove one of the Q-tip pieces along side it, this is the bottom of the wand. Slide up the straw so you can't see them. 


3. Then, place the other Q-tip alongside those two pieces so it's nice and snug. 


4. Next, flip the wand over. You'll put a dab of hot glue on the top of the straw and gently slide the snowflake inside. It should slide right along side the skewer. Glue in place.


Slide flake down until the tip of the snowflake fits snugly inside the straw.


4. Then, add the ribbon. I can't remember the name of this knot. Maybe it doesn't even have one? 


5. Then put a dab of glue underneath the ribbon to hold in place. And you're done!


VARIATION #2
Dowel Wand

1. Materials: Hot glue, snowflake on a stick, wooden dowel (about 12" long. I found mine at Joann's in a pack of 10 or so) and long piece of ribbon (about 1 yard) plus extra of same or contrasting color for the end.


2. Put a dab of hot glue on the dowel and glue snowflake in place. 


2. Next, start adding the ribbon. Put glue over the snowflake stick and dowel about an inch at a time, on three sides of the dowel. Careful, don't burn your fingers as you gently press the ribbon in place over the glue. Gently pull the ribbon taut as you twirl the ribbon around the wand over the hot glue. Or you could twirl the wand as you hold the ribbon in place. Either way works. Whichever you're most coordinated with. Be sure to overlap the ribbon over itself a bit so the wood doesn't show.


3. Glue ribbon all the way down the dowel. When you get to the bottom, cut any excess ribbon and glue in place by overlapping a few times. Then tie the ribbon (as many as you'd like) around the bottom of the snowflake in a knot. Glue in place. 


 **If you cannot find these snowflake sticks use any snowflake. Glue to a painted dowel and glue ribbon on over just the top of the wand. 

If you have any questions, please email me. And feel free to pin away! 


Print Friendly and PDF

Monday, December 10, 2012

Mrs. Field's Chocolate Chip Cookies

i.e. one of the best chocolate chip cookies recipes out there!


Again, my mother-in-law gave us this recipe. She has so many great ones! This make a HUGE batch, so if you'd like, you can halve it (I've done so for you). Why are these the best? Well, first of all, they are simple to make. Second, the flavor is perfect with the combination of white and brown sugar. And lastly, because they are a touch crispy on the edges and perfectly gooey in the middle. I like to make a full batch of these and freeze half for school lunches and then use about 1/3 of the batch to use for my Butterscotch Cookie Dough Fudge Bars.  Please note about making a full batch......do so if you have a stand-up mixer because the hand beaters cannot handle the amount of dough the large batch creates.


Mrs. Field's Chocolate Chip Cookies
Yield: 90 cookies (FULL batch) / 45 cookies (HALF batch)

Ingredients:

  • 1 lb butter (4 sticks)/1 C butter
    • softened, almost melted (if I did not leave my butter out beforehand I melt it in the micro for about 30 seconds)
  • 3 C brown sugar/ 1 1/2 C brown sugar
  • 1 1/2 C white sugar/ 3/4 C white sugar
  • 3 eggs/ 1 1/2 eggs  --at room temperature
    • (I usually just try to break it over a bowl and take out half, or when I break it pour out half the yolk and half the white)
  • 2 Tbsp vanilla/1 Tbsp vanilla
  • 6 C flour/ 3 C flour
  • 1 1/2 tsp salt/ 3/4 tsp salt
  • 1 tsp baking soda/ 1/2 tsp baking soda
  • 4 C chocolate chips/ 2 C chocolate chips

Directions: 
  1. Pre-heat oven to 360 degrees.
  2. In a large bowl (see note in description above) combine the butter and both sugars. Cream well  until light and fluffy. 
  3. Add eggs, one at a time, mixing in between each addition.
  4. Add vanilla. Mix.
  5. Add dry ingredients. It will be very thick and hard to mix. 
  6. Add in chocolate chips, mix with a spoon.
  7. Bake, on ungreased baking sheet, for 8-11 minutes. DO NOT OVER BAKE. The tops should be lightly brown in areas. 
  8. Once cooked, remove from oven and allow cookies to settle for 5 minutes on cookie sheet. 
  9. Carefully remove from pan and allow to cool on cooling rack.
  10. Enjoy warm with a glass of milk!
  11. Keep stored in airtight container. 


Print Friendly and PDF

Friday, October 19, 2012

Pumpkin Crumble Cake

Another recipe! I swear, this isn't a food blog. I just love to eat and share recipes that family members and friends always request. This is certainly one of those. When my friend Julie made this two years ago at a Halloween party I was incredibly impressed by this recipe. And Each time I make it, someone requests the recipe.

I've seen several versions of this around. They all vary slightly by how many layers (this has three), milk vs. evaporated milk vs. sweetened condensed milk, the combination of spices and the amount of pumpkin puree. I stick to this one because it seems cheaper/easier since it calls for regular milk yet it's still rich and filling.


Pumpkin Crumble Cake
Yield: 24 servings

Ingredients--by layers: 
Layer 1:
1 box white or yellow cake mix, 1 cup separated
1/2 cup butter, melted
1 egg
Layer 2: 
2 cups canned pumpkin puree (not the kind with spices added), or 2/3 of 29 oz can
3 eggs
1/2 cup brown sugar
1 1/2 tsp cinnamon
1/4 cup sugar
1 pinch nutmeg
Layer 3: 
1 cup reserved cake mix
1/2 cup flour
1/2 cup nuts, pecans or walnuts, chopped
1/2 tsp baking powder
3/4 cup sugar
1/2 cup butter, cold


  1. 1. Pre-heat oven to 350 degrees. Grease a 9x13 glass dish. 
  2.  Mix Layer 1 ingredients, (be sure to reserve 1 cup cake mix) and press down covering bottom of 9x13 pan. 
  3. Combine ingredients in Layer 2 in a large bowl. Mix with a spoon or wisk. Pour over Layer 1.
  4. Combine ingredients in Layer 3 except butter. Cut the butter into mixture with pastry blender (or criss-cross two forks). Sprinkle this crumble mixture over top of Layer 2.
  5. Bake for 35-50 minutes or until browned and no longer giggly in middle (do not over or  under bake). 
  6. It can be served warm or left to cool for at least 2 hours. I prefer to eat it at room temperature or chilled. Serve with whipped cream.


Print Friendly and PDF

Saturday, October 13, 2012

Loaded Cheesy Potato Soup


Tired of your regular potato soup recipe? Kick it up a notch by adding cheese, an abundance of vegetables  and flavor with touches of chicken, bacon and garlic.


Loaded Cheesy Potato Soup
Yield: 6 servings

Ingredients:
6 Tbs butter with a dab of olive oil
1/2 C carrots, sliced
1/2 C celery, sliced
1/2 large bell pepper, red, orange or yellow
1 C onion, chopped (about 1/2 large onion)
1 clove garlic, minced
2 large cooked potatoes, chopped into 1" cubes
1/2 C flour
2 1/4 C milk
2 C chicken broth, or one can
1/2 tsp thyme, dried
1/2 tsp basil, dried
1/2 tsp salt
1/2 tsp pepper
8 oz cheddar, shredded
4-8 slices bacon, chopped or crumbled

1. Steam chopped potatoes until barely soft when pricked with a fork.
2. Melt butter and oil in large saucepan.
3. Add celery, carrot, onion and potatoes. Saute for 10 minutes or until vegetables are tender.
4. Add garlic and saute until fragrant, about 30 seconds.
5. Stir in flour to form a roux.
6. Gradually stir in milk and broth. Bring to a boil.
7. Add thyme and basil, salt and pepper to taste.
8. Reduce heat, simmer for 15-20 minutes.
9. Once thickened, add cheese and stir until melted.
10. Garnish with bacon.

Enjoy! Print Friendly and PDF

Thursday, August 9, 2012

Olympic Themed Party & homemade Tartar Sauce


So the Olympics have arrived and are nearly over. They are the time to have an excuse to be glued to the TV all....night....long. And get nothing else done, because, why? We have the Olympics to watch. My favorite sport to watch, and always has been, is the women's gymnastics. I find them to be not only athletic but beautiful and graceful. They are sort of like freaks of nature. So young, so athletic, so beautiful like little sculptures....and so coordinated. I think that's one reason I am so mesmerized because I don't think I learned how to do a cartwheel until I was like 16. Seriously. Amazing. My new favorite event is swimming.....that Michael Phelps did it for me. And now Missy Franklin! She's a former Coloradan (I still consider myself to be one even though it's been a long while since I lived there). So we all pile on the couch and watch....skipping commercials (except the sappy "mom" ones about how the Olympians mom's are the reason they are there. Those always get me).....how did we stand it before DVR? Rooting for our country (and those that might be the under-dogs). Explaining to the children the rules and what to look for. And then watch them start diving of the couch, doing flips onto the floor and dreaming about them becoming an Olympian someday just like I did. It's a special time of year.


For the "rings" I used existing Chinese lanterns and painted them. I tried two methods...spray paint and acrylic. I liked the matte finish of the acrylic better and it didn't use as much. Plus the kids got to "help" out.


For the Opening Ceremonies my sisters and I threw a small bash. You can see our inspiration here.  We were going to to do the whole  Olympic game thing with relays and so on with our kids.....but having just returned from a family reunion that afternoon and my sister being very great with child, we opted out. Instead we let the kids drink classic Coca-Cola and watch the ceremonies with us. I have to say, England has some great skills with storytelling. I mean, my fave man, William Shakespeare was produced from that country, but they still have the talent. It was a beautiful ceremony and I was touched many times. Great job G.B.


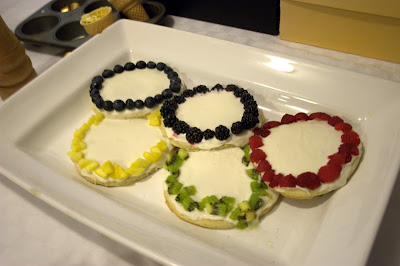
We celebrated by eating fresh Fish 'n Chips. I mean fresh. Like caught from the Kenai river in Alaska two days before fresh. (Thank you Steve and Shawn for sparing a few for us!!) My mom kept commenting on how it just melted in her mouth. Sooooo yummy. By the way, we use the McCormick beer batter box mix. Easy and delicious! (you can find it near the cocktail sauces usually by the meat department on it's own end cap....each store likes to hide it but it's there!). But the tartar sauce is to die for too. My sister-in-law Jana made up this recipe. And she let me share it with you. Also, my sister made the cookie fruit pizza. She found the inspiration from this pin.  We scattered some "gold medals" (rolo's) on the table, made little torches, drank Olympic themed coke, and my sister made us paper envelopes for our dinners to be served in. It was a fun night! How did you celebrate? Will you for the closing ceremonies?

So here is the recipe for the tartar sauce. It's not an exact recipe....she just kind of mixes the ingredients together, tastes, and adds more of what she tastes is missing. So try for yourself! And you'll want it all the time after that.

Jana's Tartar Sauce
Yields: as much as you'd like. About 1 large cereal bowl full ?

1 part mayonnaise
1/2 part ranch dressing
1/4 part mustard
1/8 part chopped dill pickles, or sweet relish is good too!
salt and pepper, to taste

When you think of parts it could be "cups", or just that much less than the previous ingredient. Does that make sense? Combine first ingredient and second and then keep adding remaining. Taste. Add more of what you like. Keep stirring and tasting until it's good. Store in a covered bowl. Enjoy!


Print Friendly and PDF

Wednesday, March 28, 2012

Happy Birthday to ME!

Photo from this party. Strawberry lemon cupcake recipe here.


Happy Birthday to ME! Wow. I am 32 years old now. Pretty cool ? I've had a good day so far. Breakfast in bed, slept in a bit longer, facebooked, blogged, visited with friends, and dinner at SmashBurger soon!

Last year I celebrated big by throwing myself a vintage themed French birthday party. It was a hit! I had a blast planning, hosting and being at it! Here is the party and some more inspiration here.  But this year I wanted to take it easy. My house looks like a tornado hit it. My life has been quite a whirlwind the past two months. Shall I expound? Okay.

Well, it really began about 15 months ago when I really started party planning. But let me cover the last two months first. You see, I received a BFA in acting years ago. It was my first passion in life for many years. And then I was able to wed and have children. It was still a passion but I tucked it away for a bit to have babies. Well, I've been able to be in three shows since my oldest was born 7 years ago. Three! An average of about every other year. Not bad but something I still love. So, I tried out for Anne of Green Gables at one of our community theaters and was cast as Marilla! I was terrified! I never dreamed of being Marilla. When I was younger I wanted to be Diana. And then I thought I could be a good Rachel. But then I was cast as Marilla. It's been fabulous!! I love the role, the play, the story. But it's been very time consuming. In addition to the play, I've been involved in a making a 20 minute video for my Church  Relief Society group, in addition to packing (we're moving in a month), in addition to buying and training our new pet puppy, in addition to overcoming a three week "cold", regular mother and wife duties, etc etc I have been so dizzy that my thoughts are not totally clear, I've forgotten simple things and I've been more short tempered (no, I am not pregnant, though it sounds like it, huh?) . But looking back beyond these last few months I've thought about the last year as the "Year of Parties" for me. I've hosted over 16 parties in the last 16 months! That's an average of one a month. It's been an exciting and busy year for sure. Here is a recap for you inspiration and pleasure!


January


March--Relief Society Party. No images  because I was making the video! I had very little  to do with the decorating :) It was a Pioneer themed party. Heirloom quilts were displayed all over, we ate these Cafe Rio Style salads, and had white Ikea lanterns and wild flowers for centerpieces. It was lovely. 


So that has been my year! It's been fabulous. Busy. Exhausting at times. 

Will you keep planning parties? Yes, of course. 
Did you make any money? Nope. It's not a business. 
Do you love it? You betcha. 
When is your next one? Well....in two weeks I'll host a Western themed party for the Law Partners, an organization I am a part of at my hubby's school (he graduates in a month, did I mention that??). But it'll be pretty low key. I'll use a lot of the same elements from this party I did a few years ago, the first of my craze. 
Is your Etsy shop still open? Nope and hasn't been for over a year now. I am not sure when I'll re-open, to be honest.
Do you want to re-open your Etsy shop? Yes, but my priority is my family right now.
Will your kids birthday parties this year? Not like the ones of the past year. They get them at ages 4, 5, 7 and every other year after that, if they'd like. We celebrate with family on the even years. 
What is average budget or your parties? I try to keep it around $50

So that is what I've been up to. So FUN! Thanks for hanging out with me for the ride. Thank you for all the inspiration!


Print Friendly and PDF