Photobucket Photobucket Photobucket Photobucket Photobucket Photobucket
Showing posts with label Christmas. Show all posts

Monday, January 23, 2012

Christmas Cookie Exchange Party

In November my church's women's organization (the Relief Society) got together for a cookie social exchange. To be honest, for some reason, this was not my favorite event I've worked on. It went alright. Not the greatest turn out. BUT we did have a lot of yummy cookies to take home. I wanted a winter wonderland feel, using red and white. I saved my inspiration to this Pinterest board that I created, "Cookies  & Milk Party." So I bought (from Dollar Tree) and brought round bulbs from home, a curtain rod and white curtains from our toy room and create a little window with red and white striped wrapping paper (from Joann's). Then we gathered cakestands from several women to display the goodies. Labeled each one so we knew who baked what.  Like, I said, it didn't turn out as well as I had hoped BUT it was fun, nonetheless. After we enjoyed each others company, a true social, and sampled each other cookies, with a glass of milk drunk from a red/white striped paper straw we gathered cookies to give away. We sent each gal home with a white gable box, affixed with a handmade tag and twine, full of cookies to give away to a neighbor or friend


Vase filled with white beans and cranberries. 


Dollar tree glitter ornaments and glitter snowflakes from Michaels. 


Each table had a unique centerpiece. 


The cookie spread. I provided the peppermint version of my double chocolate chip cookies.


The gable box gift. Handmade tag (made by one of our committee members) tied on with string!


Christmas lights and bulbs. Don't you love it when you don't check to see that all the strands of lights work BEFORE you set them up? Yeah, me too.


A questionnaire we had each take for the next years activities. 


Print Friendly and PDF

Sunday, January 1, 2012

Pomegranate Jello Salad


Happy New Year!! I am excited for this 2012 year. I am nervous because there will be changes in my personal life but I look forward to it as well.  How did you celebrate last night? We ate lots of party foods and played games together as a family. It was great though after staying up way too late for the past week is making me very very tired. Last night I was able to eat this beautiful fruit, the pomegranate. I took this photo before the jello set and by the time the jello did set, it was dark and my photos turned out, so blah!

So, be patient. There is a good one at the bottom. I have taken a photo of this dessert 3 times over the past year. Yes, it took that many and I still don't like the ones I settled with. However, although this recipe is not the most beautiful to photograph, I assure you it is incredibly delicious. The pomegranate garnish on top does help attract the patron to try this recipe. And jello with whipped topping? Sure! Sounds great. But you've got to try this extraordinary jello salad with this unique fruit.  Please, forgive my lack of photography skills and try this recipe out for yourself.

Is it a jello? A salad? A side dish or dessert? I'm not really sure but I think it can be all of them! My aunt Julie D. gave this recipe to me several years ago and I look forward to making it every year. The pomegranates start debuting around Thanksgiving and disappear again in January, usually. They are seasonal and so I try to find any excuse I can to make this jello. It's fresh, red and is a great side dish or dessert for any holiday gathering.  Plus you get to whack open a pomegranate. 

See? My ISO was off. I like the twinkling lights but yeah, it's a little yellow.


 And this...well, the cream looks white but the angle and lighting are not so great. Really, it was just the timing. The dessert was never made until right before the party and it's always dark in the winter at night. So, that's my excuse. I just need to make this further in advance to capture the true goodness.

Neither not so pinworthy. But if you DO pin this, pin the top photo of just the pretty fruit. That'll get some attention....maybe? 


Finally, I got a decent photo. My sister and I catered an event for my great aunt and we made this jello. She suggested we served them individually in clear cups so we didn't have to sloppily serve it individually on each plate. And look how pretty they look. Much nicer. And so fun to serve a party.


Okay, here is the recipe. 

Pomegranate Jello Salad 
Yield: 15-20 servings 
 
Ingredients: 
1 6 oz box of jello, any red flavor
2 C boiling water
1 C whole cranberry sauce
1 12 oz. can of crushed pineapple, undrained
3 small apples or pear, chopped fine (or very tiny chunks or slivers)
1 pomegranate, seeded (save about 1/4 cup to sprinkle on the top)

Boil 2 cups water. Add box of jello. Stir until jello dissolves. Add remaining ingredients. Pour into a 9x13 pan. Cover with saran wrap and store in fridge until completely, about 4 hours.

TIP for getting the seeds out of the pomegranate. Cut the fruit in half and then whack the back of it with a large metal serving spoon or a large metal ladle. Do this over a large enough bowl and in a sink, it will look like you are in a crime scene with all the juice that flies out as well.

Topping:
1 8 oz package of cream cheese, softened
1/3 c. sugar
2 c. whipped cream or whipped topping (thawed)
1 tsp. vanilla
Whip softened cream cheese until soft and aerated. Add whip cream and combine. Then add remaining ingredients until combined. Do not overmix or it will turn into a buttery curdled like topping.
Sprinkle with remaining pomegranate seeds.

Enjoy!
Print Friendly and PDF

Friday, December 30, 2011

Gingersnap Softie Cookie Sandwich


My sister-in-law Marci made us her mother's gingersnap cookies. They are the kind that I love. Soft, chewy and sweet. Yum! Well, the night of my daughter's 5th birthday (1 bowling trip and 5 years ago, she was born. 5 years already!) we had leftover icing from her cake. I didn't want it to go to waste and saw the gingersnaps sitting there. Hence the gingersnap softie cookie sandwich was born. Pair it with a glass of egg nog and you'll be lying on the couch for the next half hour digesting the goodness. Or, go and blog about it like I am ;) Oh, and ignore the crayon scribbles that my children artistically added to my parents' coffee table.


Here is my SIL's mother's gingersnap recipe combined with your choice of favorite icing or one of my favorites, Wilton's Buttercream. 


Gingersnap Soft Cookie
Yield: A lot. I don't really know because my sister-in-law made these

Ingredients:
2 cup sugar
1 1/2 cup butter
1/2 cup molasses
2 eggs
4 1/2 cup flour
3 tsp baking soda
1/2 tsp salt
2 tsp cinnamon
1 tsp ground cloves
1 tsp ginger
1/2 tsp ground nutmeg
1 cup granulated sugar for rolling
  1. Pre-heat oven to 350 degrees.
  2. Cream sugar & butter until well blended and fluffy.
  3. Add eggs and molasses. Combine.
  4. Mix remaining ingredients. Mix well.
  5. Roll into 1 1/2" balls. Roll and coat in sugar.
  6. Bake at 350 for 8 minutes. Do not overbake. 
  7. Remove from oven and let rest on cookie sheet before replacing to cookie sheet.
  8. Once completely cooled fill with 1-2 Tbsp of icing (recipe below).


Wilton's Buttercream Icing
Makes about 3 cups icing

Ingredients: 
1/2 cups shortening
1/2 cup butter
1 tsp vanilla (if you have clear on hand make that for a more white look)
4 cups powdered sugar
2 Tbsp milk

In large bowl, cream shortening and butter with electric mixer. Add vanilla. Gradually add sugar, one cup at a time, beating well on medium speed. Scrape sides and bottom of bowl often. When all sugar has been mixed in, icing will appear dry. Add milk and beat at medium speed until light and fluffy. Keep bowl covered with a damp cloth until ready to use. For best results, keep icing bowl in refrigerator when not in use. Refrigerated in an airtight container, this icing can be stored 2 weeks. Rewhip before using.

Print Friendly and PDF

Thursday, December 29, 2011

Cranberry Cilantro Relish Spread


At my book club last month one of the gals made this cranberry spread and it was amazing! She said it was a knock off of Harry and David's food products (which I'd never heard of) but you can make it yourself for a lot less and in about 10 minutes. This is an elegant yet bold dish that marries flavors beautifully. The tartness of the lime and cranberries with the tangy cilantro combines nicely with the sweetness of the sugar. It'll be a winner at any event particularly a Christmas or New Years Eve party. Everyone will want a copy of this recipe.

If you have a large food processor it'll take you about 5 minutes to make. If you're like me and have a very small one it took me about 15 minutes. I process the cranberries in 3 sets, then the remaining ingredients. I did have to cut my green onions and stem the cilantro before processing them all together.

TIP: to cut cilantro or herbs of any kind, you can easily do this by removing the leaf from the stem and place them in a mug. Using your culinary shears, cut them directly inside the mug. (If you want me to show a picture, I can show you how that works). It's quicker and cleaner than using a cutting board and knife. You can chop it as fine or course as you'd like this way.


Cranberry Cilantro Relish Spread
Ingredients:
1 12-oz bag of fresh cranberries
1 bunch cilantro, stemmed as much as possible
1 bunch green onions
pinch of salt
3/4 cup sugar
2 limes, juiced
2 jalapeno peppers
2 8-oz bricks of cream cheese
up to 1/2 tsp cumin, optional

1. Combine all ingredients (except the cheese) in a food processor, chop.
2. Spread over  the two blocks of cream cheese.
3. Chill in refrigerator for best results to allow flavors to meld together.
4.  Serve with crackers, croustini's or even baguettes or tortilla chips.
5. Enjoy at your next holiday event and you'll leave very popular. Print Friendly and PDF

Tuesday, December 13, 2011

Marshmallow Snowmen (and women)

Are you looking for a simple yet festive craft that doubles as a treat to bring in the festive season? Try making marshmallow snowmen, er.....women, er......people. How about Mary Poppins?


This activity is more for you than for your child, or do it together. It involves a lot of tiny pieces of candy and a lot of sticky stuff like corn syrup and peanut butter which is hard to maneuver. If you don't mind what these look like then go ahead and assemble them together but if you are giving these away as gifts (such as teacher or neighbor gifts...I'm thinking hot chocolate stirrers? Maybe next year....) then I'd just assemble it yourself. They do take a bit of time and patience while drying. I had each girl from our preschool group just tell me which features they wanted and I assembled it for them, allowing them to stick on the buttons and eating the Oreo cream. Once they were dry I put them in a sandwich bag and tied it up so they could take it home!


Materials: 
You probably have most of these things on hand. Just use what you can find in your pantry or leftover Halloween candy!
--6" lollipop stick or straw
--Marshmallows--3 regular sized (mini ones for piles of snowballs or cloud effect!)
--Eyes--mini chocolate chips or mini M&M's
--Buttons--mini M&M's smarties or red hots
--Scarf--lemon heads or fruit roll-ups
--Hat--chocolate ring with large gum drop or other chocolate candy on top of half an Oreo cookie
--Arms--pretzel sticks
--Nose--mini M&M or candy corn
--Mouth--licorice rope or mini chocolate chips
--Corn syrup and/or peanut butter
--Mini cupcake liner, optional


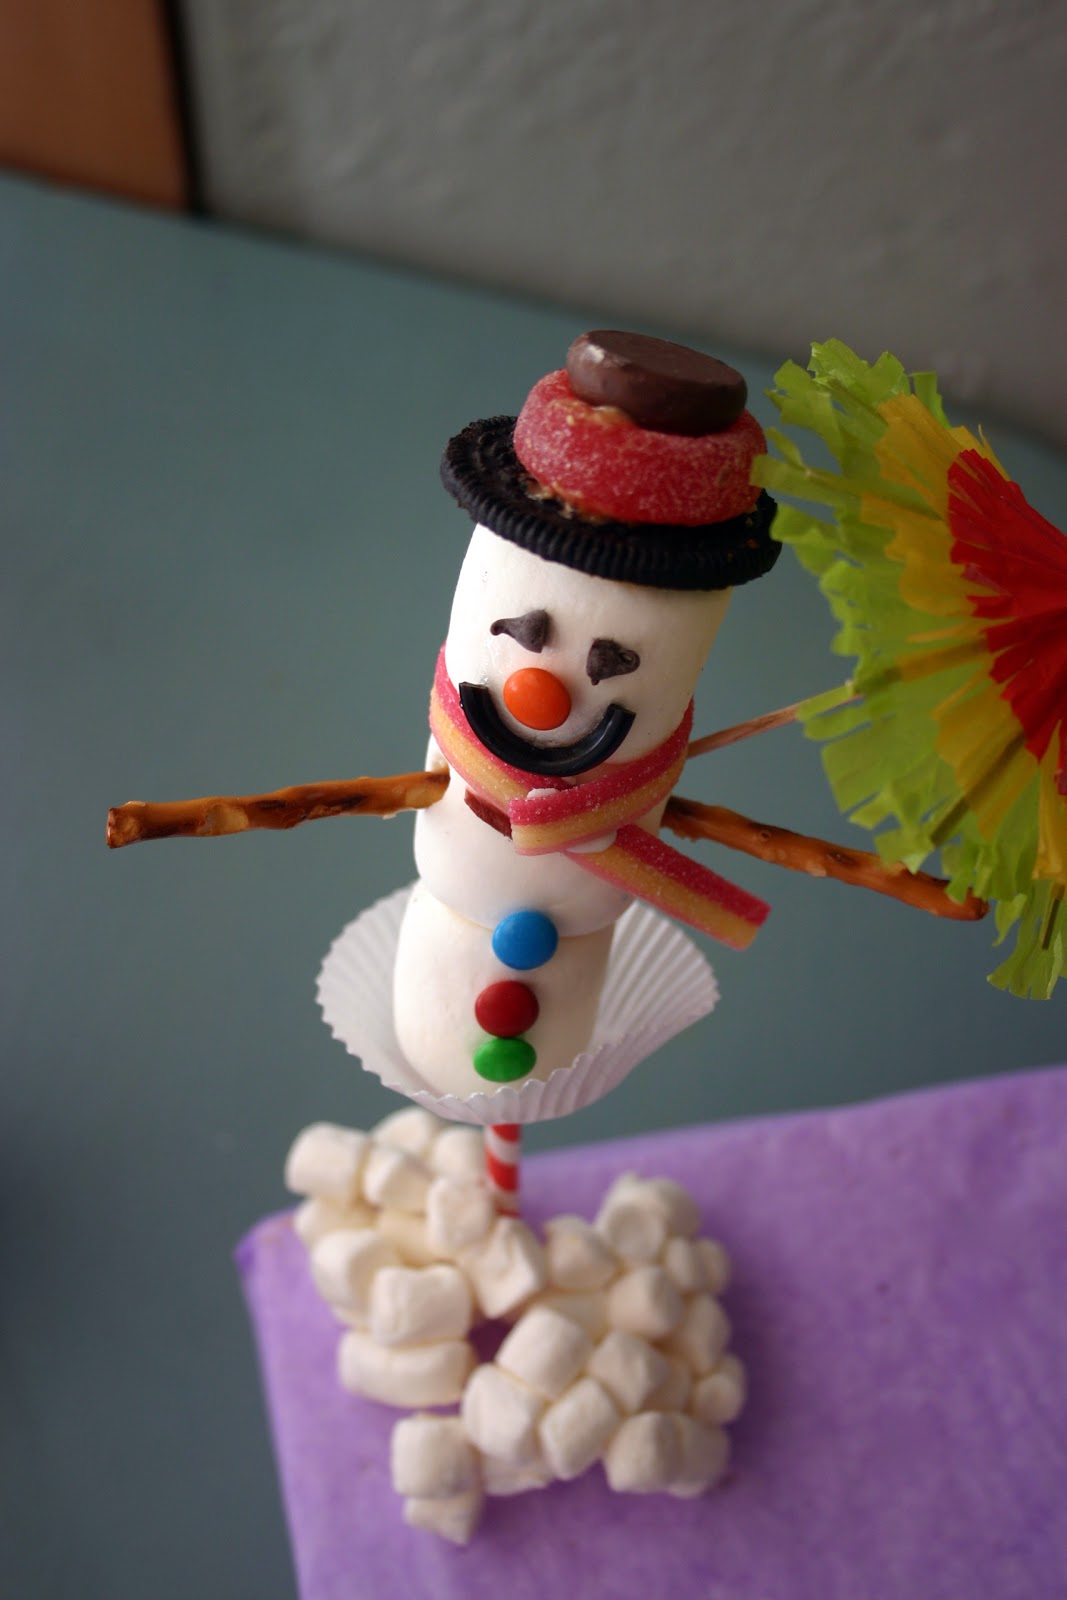
First, you start with three regular sized marshmallows. Using either a 6" lollipop stick or straw (though paper straws are not as strong they are so cute!) slide the mallows on. Next, insert eyes. I used mini chocolate chips (but any small candy item will do). I poked a tiny hole using a toothpick in corn syrup then inserted the chip. For the nose, I used mini M&M's for some and then for others I used cut candy corn. For the mouth there are several options. You can use licorice rope (I used black because I had it leftover from marshmallow spiders) or a row of mini chocolate chips. And for the buttons I used mini M&M's but smarties or red hots would work for these too. For all of the facial and button features, I used a toothpick dipped into corn syrup to stick them on. Corn syrup does take a long time to dry. If you're in a hurry or they are not sticking, just dab on some peanut butter. The arms are just pretzel sticks stuck into a hole that I stabbed with a toothpick first.

The scarf and hats were the trickiest to make stick. With that hats I twisted Oreo's apart, scraped (or let the kids lick if it is for them) off the cream (I had some left over from Halloween) and used one half. Then I bought this Christmas mix that had jelly rings and chocolate covered jelly candies. They were nice and round. I stuck them all together with peanut butter after I realized the corn syrup was just sliding around with the weight. Corn syrup is a good option for kids with allergies or for a glossy look.


The scarves we used were made out of sour air heads. It looked kind of "snowy" with the sugar coating and it was striped. I just cut them down the middle, lengthwise, and got 2 scarves out of each candy. I also thought of using fruit by the foot or fruit roll-ups for a more solid color. The nice thing about fruit roll-ups would have done is stick to each other better. For mine, I tried using corn syrup and peanut butter to make the scarf stick to itself but they wouldn't stick. Finally, I decided to use a peppermint brach nougat candy (I LOVE those things). I just tore off a piece, smashed it and stuck them together. That worked like a charm!

For the Mary Poppins person I used a cookie, then jelly ring then a Hershey kiss (with the tip bit off) inserted into the ring. For fun I got out some cocktail umbrella's to finish off her look.


For the snowman, well, he got a sword.


 Have fun!

Print Friendly and PDF

Friday, December 9, 2011

Rosemary Place Settings

We were going to host Thanksgiving so I started searching Pinterest for some decorating ideas. It turned out that we didn't end up hosting but I still requested to make the place settings. Nothing elaborate, just something simple. I saw this on Pinterest and made it my own.


Rosemary (still left from our frozen garden), a simple ribbon tied to a name tag. And rosemary adds such a nice scent to the table as well. I think this would be nice for Christmas too.


Print Friendly and PDF